Interrupt handling in Go

If you want to write a driver for built-in MCU peripheral you will usually encounter two things:
-
interrupt handling (definitely),
-
using DMA (not necessarily).
In this article I will explain the idiomatic way of interrupt handling when it comes to the bare-metal programming in Go.
Why we need interrupts?
There is probably no more basic way of communicating with a microcontroller than using a push button. We can definitely handle this simple external peripheral without using interrupts:
for {
	if buttons.User.Read() != 0 {
		buttonPressed()
	}
}
Assuming we have a debouncing handled by some external circuit and we are interested in button state (pressed) this polling code should work fine. If we want to respond for a change in the button state (released → pressed) the code may look like this:
for {
	for buttons.User.Read() == 0 {
	}
	buttonPressed()
	for buttons.User.Read() != 0 {
	}
}
The problem with our sample code is clear – the power consumption. We can significantly improve this system at the expense of response time:
for {
	for buttons.User.Read() == 0 {
		time.Sleep(50 * time.Millisecond)
	}
	buttonPressed()
	for buttons.User.Read() != 0 {
		time.Sleep(50 * time.Millisecond)
	}
}
A side effect of this change is some kind of software debouncing, imperfect but better than nothing. A good debouncing algorithm should filter false button presses caused, for example, by mechanical vibrations or electromagnetic interferences.
However, in most cases a fast response is essential and interrupts give us both low power consumption and fast response.
External interrupt controller
Virtually every microcontroller has an ability to use IO pins as source of external interrupts. Usually, there is some built-in subsystem consisting of a certain number of edge detectors that can be configured to detect changes on digital inputs.
The figure below shows the structure of an external interrupt controller (EXTI) you can found in every STM32 microcontroller:
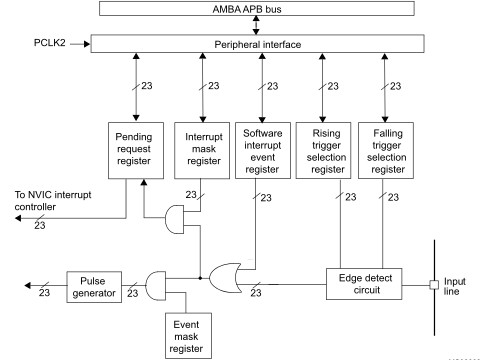
An input line can be connected to one of 23 independent edge detectors. The number of detectors varies but only 16 of them can be connected to GPIO pins. Each interrupt line can be enabled/disabled using the interrupt mask register. Generated interrupts are maintained in active state by the pending request register until you deassert them by clearing the corresponding bits.
Push button as interrupt source
So we want to replace our polling code with an interrupt based one. Here you are:
package main

import (
	"embedded/rtos"

	"github.com/embeddedgo/stm32/hal/exti"
	"github.com/embeddedgo/stm32/hal/irq"

	"github.com/embeddedgo/stm32/devboard/nucleo-l476rg/board/buttons"
	"github.com/embeddedgo/stm32/devboard/nucleo-l476rg/board/leds"
)

func main() {
	// Get the pin associated with the User button. It will be the
	// PA0 in case of F4-Discovery or PC13 in case of Nucleo boards.
	pin := buttons.User.Pin()

	// The EXTI line directly corresponds to the pin number (0 for PA0,
	// 13 for PC13). You can't use PAn, PBn, PCn, ... at the same time
	// as external interrupt sources. This is an EXTI limitation.
	line := exti.Lines(1 << pin.Index())

	// Connect the EXTI line to the GPIO port.
	line.Connect(pin.Port())

	// Enable rising edge detection (the button active state is high).
	line.EnableRiseTrig()

	// Enable this line as interrupt source.
	line.EnableIRQ()

	// Enable interrupt source in the Cortex-M NVIC. The EXTI15_10 is an
	// IRQ number that corresponds to the EXTI line numbers from 10 to 15
	// (Nucleo board). In case of F4-Discovery it will be EXTI0.
	irq.EXTI15_10.Enable(rtos.IntPrioLow, 0)

	for {
		println("i am alive")
		rtos.Nanosleep(1e9)
	}
}

func toggle(led leds.LED) {
	led.Set(led.Get() + 1)
}

//go:interrupthandler
func EXTI15_10_Handler() {
	toggle(leds.User)
}
If you want to follow the subsequent steps you have to save this code in the $HOME/irqtest/main.go file.
I think the comments in the code clearly describe each step of EXTI configuration. Additional explanation may be needed for irq.EXTI15_10.Enable(rtos.IntPrioLow, 0) statement. This call enables an interrupt source in the Cortex-M interrupt controller called NVIC. In our case one IRQ number in NVIC is shared by six EXTI lines.
The EXTI15_10_Handler function will be called on every EXTI15_10 interrupt. Because only the line 13 is enabled we don’t need to check which line caused the interrupt.
The buttonPressed() call from the polling examples was replaced by toggle(leds.User) so we can see how this code behaves on real hardware.
Let’s write build.sh script to facilitate subsequent builds of our sample program:
#!/bin/sh

GOTARGET=stm32l4x6
GOMEM=0x20000000:96K,0x10000000:32K
GOTEXT=0x8000000
IRQNAMES=$HOME/embeddedgo/stm32/hal/irq

. $HOME/embeddedgo/scripts/build.sh $@
If you want to use F4-Discovery or other supported STM32 MCU/board you have to modify GOTARGET and GOMEM variables. Now we can use this script to build our sample program:
$ cd $HOME/irqtest
$ go mod init irqtest
$ chmod a+x build.sh
$ ./build.sh
go: finding github.com/embeddedgo/stm32 v0.2.0
go: downloading github.com/embeddedgo/stm32 v0.2.0
go: extracting github.com/embeddedgo/stm32 v0.2.0
$ ls
build.sh  go.mod  go.sum  irqtest.elf  main.go
We will use OpenOCD to load irqtest.elf to the Nucleo board. Let’s write load.sh script:
#!/bin/sh

INTERFACE=stlink
TARGET=stm32l4x
TRACECLKIN=80000000

. $HOME/embeddedgo/scripts/load-oocd.sh
and use it:
This is definitely not what we wanted. The problem is that the interrupt is active until we clear it in the pending request register. Let’s clear it:
func EXTI15_10_Handler() {
	p := exti.Pending() & (exti.L15<<1 - exti.L10)
	p.ClearPending()
	toggle(leds.User)
}
As this IRQ is shared by six EXTI lines we read six pending bits and clear them all if set.
This version works much better but it’s slightly unreliable. Even though the Nucleo’s button is equipped with a simple RC debouncing circuit it still generates spurious open/close transitions when pressed. We need some kind of debouncing algorithm.
The idiomatic way of interrupt handling
The idiomatic way of interrupt handling in Go is to divide the handler into two parts:
-
the first one that works in handler mode,
-
the second one that works in thread mode.
This is similar concept to the Linux software and hardware interrupts. The real interrupt handler does things that can’t be done in thread mode or that require hard-realtime service. Then it passes control to the thread mode and the further work is done by goroutines.
The noos port introduces embedded/rtos.Note type that allows the interrupt handlers to communicate with goroutines. This isn’t a new thing because the runtime.note exists in the Go runtime for a long time. The noos port exposes it in the rtos package and introduces a way for interrupt handlers to wakeup gorutines sleeping on notes.
A typical control flow is shown in the diagram below:
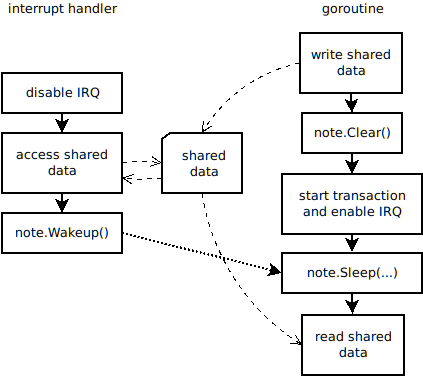
A goroutine prepares data for the next transaction and then clears the note. The Note.Clear method has memory barrier semantic. It ensures the prepared data will be visible consistent for the interrupt handler even if it runs on the other core.
The goroutine starts the transaction according to the hardware protocol implemented by peripheral, enables interrupts and then waits for the end of transaction using Note.Sleep method.
The interrupt handler usually disables its interrupt source to ensure that it will not be called again until the goroutine will be ready for next transaction. This scheme can be used if the interrupt is a part of some kind of transaction processing protocol. Fortunately, the vast majority of peripheral devices operate on the basis of a transactional model. If the subsequent interrupt is allowed to occur before the previous one has been serviced many peripherals implement pending state to avoid losing it.
Then the handler handles all hard-realtime things, reads and writes shared data, and if everything is done it wakes the goroutine up.
To show it all in practice let’s rewrite the previous code in the more idiomatic way:
package main

import (
	"embedded/rtos"

	"github.com/embeddedgo/stm32/hal/exti"
	"github.com/embeddedgo/stm32/hal/irq"

	"github.com/embeddedgo/stm32/devboard/nucleo-l476rg/board/buttons"
	"github.com/embeddedgo/stm32/devboard/nucleo-l476rg/board/leds"
)

func main() {
	pin := buttons.User.Pin()
	line := exti.Lines(1 << pin.Index())
	line.Connect(pin.Port())
	line.EnableRiseTrig()
	irq.EXTI15_10.Enable(rtos.IntPrioLow, 0)

	go buttonLED()

	for {
		println("i am alive")
		rtos.Nanosleep(1e9)
	}
}

func buttonLED() {
	for {
		waitBtn()
		toggle(leds.User)
	}
}

func toggle(led leds.LED) {
	led.Set(led.Get() + 1)
}

var note rtos.Note

func waitBtn() {
	note.Clear()
	pin := buttons.User.Pin()
	exti.Lines(1 << pin.Index()).EnableIRQ()
	note.Sleep(-1)
}

//go:interrupthandler
func EXTI15_10_Handler() {
	p := exti.Pending() & (exti.L15<<1 - exti.L10)
	p.DisableIRQ()
	p.ClearPending()
	note.Wakeup()
}
We introduced a new goroutine to handle the user button and LED. It uses the waitBtn function to wait for the button to be pressed. The waitBtn function clears the note, enables interrupts and falls asleep. Note that the interrupt enable call has been moved here from the main function.
As we have seen before the button is allowed to generate spurious interrupts so the handler disables generation of interrupts and then clears pending state. This is required because waking the note twice before clearing it is treated by runtime as fatal error (this has changed: now there is allowed to call Note.Wakeup multiple times before clearing the note).
Button debouncing done right
There are many debouncing algorithms but I will present the best one ;-) which is simple and perfectly uses the features of rtos.Note type:
package main

import (
	"time"
	"embedded/rtos"

	"github.com/embeddedgo/stm32/hal/exti"
	"github.com/embeddedgo/stm32/hal/irq"

	"github.com/embeddedgo/stm32/devboard/nucleo-l476rg/board/buttons"
	"github.com/embeddedgo/stm32/devboard/nucleo-l476rg/board/leds"
)

func main() {
	pin := buttons.User.Pin()
	line := exti.Lines(1 << pin.Index())
	line.Connect(pin.Port())
	line.EnableRiseTrig()
	line.EnableFallTrig()
	irq.EXTI15_10.Enable(rtos.IntPrioLow, 0)

	go buttonLED()

	for {
		println("i am alive")
		time.Sleep(time.Second)
	}
}

func buttonLED() {
	for {
		waitBtn(1)
		toggle(leds.User)
		waitBtn(0)
	}
}

func toggle(led leds.LED) {
	led.Set(led.Get() + 1)
}

var note rtos.Note

func waitBtn(state int) {
	line := exti.Lines(1 << buttons.User.Pin().Index())
	for {
		note.Clear()
		line.EnableIRQ()
		wait := time.Duration(-1)
		if buttons.User.Read() == state {
			wait = 50 * time.Millisecond // we want 50 ms of stable state
		}
		if !note.Sleep(wait) {
			line.DisableIRQ()
			return
		}
	}
}

//go:interrupthandler
func EXTI15_10_Handler() {
	p := exti.Pending() & (exti.L15<<1 - exti.L10)
	p.DisableIRQ()
	p.ClearPending()
	if pin := buttons.User.Pin(); p>>pin.Index()&1 != 0 {
		note.Wakeup()
	}
}
What has been changed? The edge detector now detects both rising and falling edges of the input signal. The waitBtn function gained one parameter which is the button state it should waiting for.
The waitBtn function no longer waits for the first signal from the handler. Now it waits in a loop for the desired stable state. The state is considered stable if it is maintained for at least 50 ms. To determine this it simply uses Note.Sleep method with the timeout set to 50e6 ns.
The buttonLED function now waits for the button to be pressed then toggles the LED and next waits for the button to be released as in polling algorithm from begginningo of this article. Now the button works perfectly:
Interrupts and linker
In the previous article I wrote that the linker is responsible for creating the interrupt vector table. A more inquisitive reader may ask how does the linker know the interrupt number associated with the EXTI15_10_Handler function? The linker doesn’t know interrupt names but the build.sh script knows them if you specified IRQNAMES variable. It generates a zisrnames.go file that contains the mapping:
// DO NOT EDIT THIS FILE. GENERATED BY build.sh.

package main

import _ "unsafe"

//go:linkname WWDG_Handler IRQ0_Handler
//go:linkname PVD_PVM_Handler IRQ1_Handler
//go:linkname TAMP_STAMP_Handler IRQ2_Handler
//go:linkname RTC_WKUP_Handler IRQ3_Handler
//go:linkname FLASH_Handler IRQ4_Handler
//go:linkname RCC_Handler IRQ5_Handler
//go:linkname EXTI0_Handler IRQ6_Handler
//go:linkname EXTI1_Handler IRQ7_Handler
//go:linkname EXTI2_Handler IRQ8_Handler
//go:linkname EXTI3_Handler IRQ9_Handler
//go:linkname EXTI4_Handler IRQ10_Handler
//go:linkname DMA1_CH1_Handler IRQ11_Handler
//go:linkname DMA1_CH2_Handler IRQ12_Handler

...

//go:linkname DMA2D_Handler IRQ90_Handler
You can see this file if compilation fails.
Michał Derkacz