Playing with linear accelerometer

Finally, the STM32 library gained its first driver to the real I/O peripheral: Serial Peripheral Interface (SPI). It’s a port of the Emgo driver with some improvements based on real-life experiences.
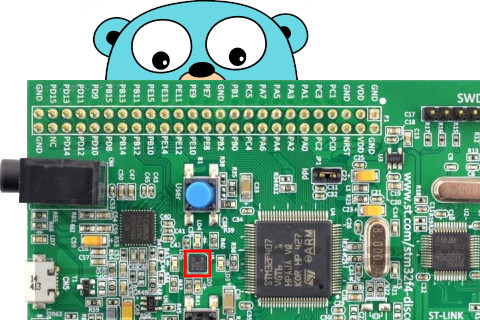
Although I have the STM32F4-Discovery board for many years, I’ve never used the onboard accelerometer (the chip marked red on the image above). The new SPI driver and this article gives me a great opportunity to play with it.
SPI driver
You can use the SPI driver (and any other Embedded Go driver in the future) in two ways.
The first more general way is to use the spi package. In this case you have to handle many things in your code:
-
Select the instance of SPI peripheral.
-
Select the I/O pins you want to use as SCK, MOSI, MISO, NSS signals.
-
Determine the right alternate function to configure these pins.
-
Determine the DMA streams/channels/requests that can be used for this peripheral, select one set and use it with the driver.
-
Enable appropriate interrupts in the NVIC and implement couple of interrupt handlers as small wrappers over the
spi.Driver.*ISRmethods.
The second way is to use the spin package which contains the ready to use driver for SPIn peripheral. It does 3, 4, 5 for you. You can go this way as long as you don’t encounter a conflict in the use of the same DMA stream/channel by two different peripherals.
The onboard accelerometer
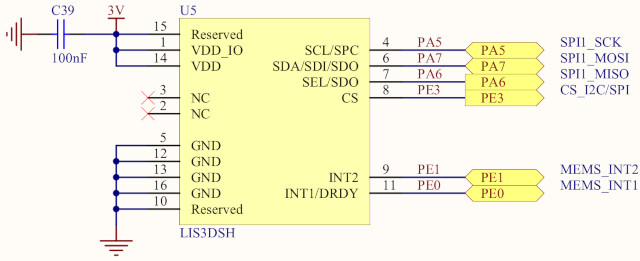
Even if we use the the spin package we need to deal with items 1 and 2 so let’s see how the onboard accelerometer chip is connected to the microcontroller.

The figure above was cut from the F4-Discovery documentation. It gives us all information needed to setup the SPI driver:
// Allocate GPIO pins

pa := gpio.A()
pa.EnableClock(true)
sck := pa.Pin(5)
miso := pa.Pin(6)
mosi := pa.Pin(7)

pe := gpio.E()
pe.EnableClock(true)
cs := pe.Pin(3)

// Configure SPI pins

spi1.UsePinMaster(spi.SCK, sck)
spi1.UsePinMaster(spi.MOSI, mosi)
spi1.UsePinMaster(spi.MISO, miso)

cs.Set() // CS active state is low
cs.Setup(&gpio.Config{Mode: gpio.Out})
As you can see we first allocate the pins and next configure them. You definitely should maintain the pin and peripheral allocation in one place in your source code. This gives you a full picture of the pins and peripherals used by your project.
The code above requires the following packages:
"github.com/embeddedgo/stm32/hal/gpio"
"github.com/embeddedgo/stm32/hal/spi/spi1"
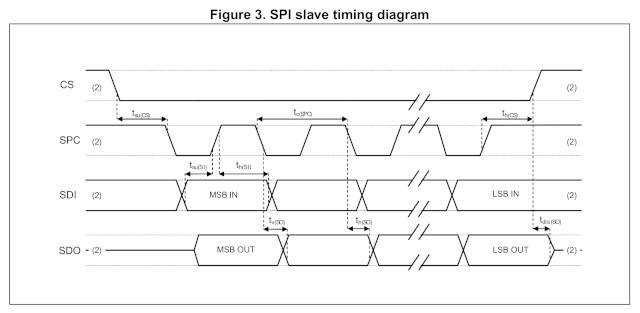
The driver configuration is finished but you can’t use it yet because the SPI protocol itself has some additional parameters and the default values don’t match the ones described in the LIS3DSH datasheet:

Table 5 gives us the maximum SPI clock frequency: 10 MHz.

The Figure 3 allows us to determine CPOL and CPHA parameters. As you can see the idle state of SPC (SPI clock) is high so CPOL=1. The SDI value is probed at the rising edge of SPC so CPHA=1.
// Configure and enable SPI

d := spi1.Driver()
d.Setup(spi.Master|spi.CPOL1|spi.CPHA1|spi.SoftSS|spi.ISSHigh, 10e6)
d.SetWordSize(8)
d.Enable()
The SPI configuration consist of:
-
spi.Master sets the SPI1 in master mode,
-
CPOL1|spi.CPHA1 sets the clock polarity and phase,
-
spi.SoftSS|spi.ISSHigh disables hardware control on slave select signal because the onboard chip isn’t connected to any pin that can be used as SPI1 NSS,
-
10e6 sets the maximum clock frequency to 10 MHz.
We also selected the SPI word size and enabled the peripheral.
First conversation with the LIS3DSH
Now we have everything configured. It’s time to talk with our accelerometer. The application note will help us with the first steps. In the chapter 2 it describes the startup sequence and gives us a simple algorithm to read acceleration data:
Startup sequence

0. Wait 10 ms from power on for the end of boot procedure.

1. Write CTRL_REG4 = 67h // X, Y, Z enabled, ODR = 100 Hz
2. Write CTRL_REG3 = C8h // DRY active high on INT1 pin

Reading acceleration data using the status register

1.  Read STATUS
2.  If STATUS(3) = 0, then go to 1
3.  If STATUS(7) = 1, then some data have been overwritten
4.  Read OUT_X_L
5.  Read OUT_X_H
6.  Read OUT_Y_L
7.  Read OUT_Y_H
8.  Read OUT_Z_L
9.  Read OUT_Z_H
10. Data processing
11. Go to 1
Let’s write it in Go:
const (
	CTRL_REG4 = 0x20
	CTRL_REG3 = 0x23
	STATUS    = 0x27
	OUT_X_L   = 0x28
	OUT_X_H   = 0x29
	OUT_Y_L   = 0x2A
	OUT_Y_H   = 0x2B
	OUT_Z_L   = 0x2C
	OUT_Z_H   = 0x2D
)

write := func(addr, val uint8) {
	cs.Clear()
	d.WriteReadByte(addr)
	d.WriteReadByte(val)
	cs.Set()
}

read := func(addr uint8) byte {
	cs.Clear()
	d.WriteReadByte(1<<7 | addr)
	val := d.WriteReadByte(0)
	cs.Set()
	return val
}

// Startup sequence

time.Sleep(10*time.Millisecond - rtos.Nanotime())
write(CTRL_REG4, 0x67)
write(CTRL_REG3, 0xC8)

// Reading acceleration data using the status register

for {
	status := read(STATUS)
	if status>>3&1 == 0 {
		continue
	}
	datalost := status>>7&1 != 0

	xl := read(OUT_X_L)
	xh := read(OUT_X_H)
	yl := read(OUT_Y_L)
	yh := read(OUT_Y_H)
	zl := read(OUT_Z_L)
	zh := read(OUT_Z_H)

	x := int(int16(xl)|int16(xh)<<8) * 2000 / 32768
	y := int(int16(yl)|int16(yh)<<8) * 2000 / 32768
	z := int(int16(zl)|int16(zh)<<8) * 2000 / 32768

	println(x, y, z, datalost)
}
The video below shows our program in action:
You can find the complete source code here.
This code works but contains a subtle bug that doesn’t have a chance to reveal in case of relatively slow MCU. The following three sequences:
cs.Set()
cs.Clear()

cs.Clear()
d.WriteReadByte(...)

d.WriteReadByte(...)
cs.Set()
have undefined duration. The LIS3DSH datasheet specifies:
-
CS setup time: 6 ns,
-
CS hold time: 8 ns.
Such small time intervals are unreachable for our 168 MHz microcontroller but a decent code should handle this in some way.
Improvements
Tracking rows of numbers on the screen isn’t easy. Let’s replace println(x, y, z, datalost) with something more readable:
func show(x, y, z int) {
	gauge("x", x)
	gauge("y", y)
	gauge("z", z)
	print("+-----------------------------------------+\n")
	time.Sleep(100*time.Millisecond)
}

func gauge(name string, v int) {
	const bar = "--------------------"
	const spc = "                    "
	v /= 100
	print("|")
	switch {
	case v > 0:
		if v > 20 {
			v = 20
		}
		print(spc, name, bar[:v], spc[v:])
	case v < 0:
		if v < -20 {
			v = -20
		}
		print(spc[:20+v], bar[20+v:], name, spc)
	default: // v == 0:
		print(spc, name, spc)
	}
	print("|\n")
}
Now it’s easier to see what’s going on:
Our current code requires twelve ReadWriteByte calls to read x, y, z. Every call is a new SPI transaction that internally requires setting interrupts and sleeping on the note. This in turn implies four context switches (two for interrupt handler and two for notesleep system call). But we can read x, y, z using only one SPI transaction:
type LIS3DSH struct {
	d  *spi.Driver
	cs gpio.Pin
}

func (a *LIS3DSH) ReadXYZ() (x, y, z int) {
	buf := [1 + 6]byte{1<<7 | OUT_X_L}
	a.cs.Clear()
	a.d.WriteRead(buf[:1], buf[:])
	a.cs.Set()
	x = int(int16(buf[1])|int16(buf[2])<<8) * 2000 / 32768
	y = int(int16(buf[3])|int16(buf[4])<<8) * 2000 / 32768
	z = int(int16(buf[5])|int16(buf[6])<<8) * 2000 / 32768
	return
}
You have to replace the for loop with this code:
a := LIS3DSH{d, cs}
for {
	status := read(STATUS)
	if status>>3&1 == 0 {
		continue
	}
	show(a.ReadXYZ())
}
The next improvement will be getting rid of the busy polling the STATUS register. We have data ready signal on the INT1 pin which is connected to the PE0. Let’s use it:
// Allocate GPIO pins

// ...
dr := pe.Pin(0)

// Configure EXTI

dr.Setup(&gpio.Config{Mode: gpio.In})
dri := exti.Lines(1 << dr.Index())
dri.Connect(dr.Port())
dri.EnableRiseTrig()
irq.EXTI0.Enable(rtos.IntPrioLow, 0)
The code below is a very simple driver for the LIS3DSH accelerometer:
type LIS3DSH struct {
	d   *spi.Driver
	cs  gpio.Pin
	dri exti.Lines
	drn rtos.Note
}

func NewLIS3DSH(d *spi.Driver, cs gpio.Pin, dri exti.Lines) *LIS3DSH {
	return &LIS3DSH{d: d, cs: cs, dri: dri}
}

func (a *LIS3DSH) Init() {
	time.Sleep(10*time.Millisecond - rtos.Nanotime())
	a.cs.Clear()
	a.d.WriteRead([]byte{CTRL_REG4, 0x67}, nil)
	a.cs.Set()
	a.cs.Clear()
	a.d.WriteRead([]byte{CTRL_REG3, 0xC8}, nil)
	a.cs.Set()
}

func (a *LIS3DSH) ReadXYZ() (x, y, z int) {
	a.drn.Clear()
	a.dri.EnableIRQ()
	a.drn.Sleep(-1)
	buf := [1 + 6]byte{1<<7 | OUT_X_L}
	a.cs.Clear()
	a.d.WriteRead(buf[:1], buf[:])
	a.cs.Set()
	x = int(int16(buf[1])|int16(buf[2])<<8) * 2000 / 32768
	y = int(int16(buf[3])|int16(buf[4])<<8) * 2000 / 32768
	z = int(int16(buf[5])|int16(buf[6])<<8) * 2000 / 32768
	return
}

func (a *LIS3DSH) ISR() {
	a.dri.DisableIRQ()
	a.dri.ClearPending()
	a.drn.Wakeup()
}
The Init method performs the initialization sequence but uses only two SPI transactions instead of four.
The ReadXYZ method now waits on the note for DRDY interrupt before read x, y, z.
The ISR method implements the handler for EXTI interrupt:
//go:interrupthandler
func EXTI0_Handler() { accel.ISR() }
You can read more about this topic in the previous article.
You can use LIS3DSH type this way:
// Reading acceleration data using DRDY interrupt

accel = NewLIS3DSH(d, cs, dri)
accel.Init()
for {
	show(accel.ReadXYZ())
}
The complete code is here.
Another improvement of our simple program could be using the onboard LEDs instead of debug messages. We could transform our discovery board into some kind of electronic spirit level. It would be nice to use PWM to control LED brightness and this opens up a fascinating world of the STM32 timers. However, this article is already long enough, so we will leave PWM and timers for another one.
Michał Derkacz