Getting started with Bluetooth LE
Bluetooth LE is increasingly popular wireless communication standard. It’s not only a power efficient version of classic Bluetooth (originally designed as personal area network) but has also capabilities (mesh profile, IPv6 support) to handle other use cases typically called IoT.
Its newest incarnation (BLE 5) features 2 Mb/s bitrate, long-range mode, improved broadcast capability and better coexistence efficiency with other Bluetooth and WiFi traffic.
The Nordic Semiconductor nRF5 MCU family is the main player in this field from the very beginning. You can choose from legacy Cortex-M0 based nRF51 series, through mainline Cortex-M4 based nRF52 series up to the newest two-core Cortex-M33 nRF53 series.
We will focus our attention on nRF52840 chip because of its wide availability and relatively big memory which makes it an ideal target for the memory hungry Go compiler. The possibilities for optimizing the binary size generated by the current Go compiler are enormous but still not on the priority list.
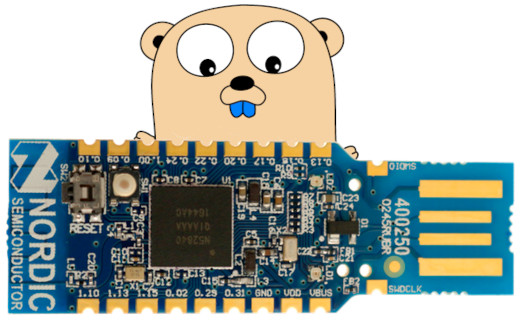
There are many nRF52840 based modules and development boards available on the market. The one in the picture above, called nRF52840 Dongle (or PCA10059) is in my opinion the best one. It’s a development board but small enough to be used in real projects. It is easily programmable thanks to the preprogrammed bootloader and has all the necessary things: LEDs, buttons, ESD protected USB connector, antenna, plenty of GPIO pins and RTC crystal. If you want to buy any other nRF5 module/devboard pay attention that it includes the 32768 Hz resonator. It’s important for low power operation and generally makes things easier. This dongle is widely available and relatively cheap.
Radio
The one thing that distinguishes the nRF5 family from the other ARM based microcontrollers is its multiprotocol radio. It can handle Bluetooth LE, ANT and other IEEE 802.15.4 based protocols like Thread, Zigbee. It also supports proprietary protocols like the one used by popular nRF24L01 modules.
The integrated radio peripheral with its -95 dBm Rx sensitivity and 8 dBm Tx power is impressive piece of RF technology. At the same time it’s rather simple from the programmer point of view. It doesn’t handle much more itself than sending and receiving packets, however the packet layout is very customizable.
You can customize the packet header and CRC sum, select the bit endianness for payload and some header fields but the other protocol things like timing and encryption must be handled externally by software with a help of other hardware like AES ECB peripheral, timers and PPI. The PPI is my favorite thing. It allows you to setup multiple peripherals to communicate without CPU intervention. It’s simple concept but gives you the power similar to Unix pipelines.
As you can see you can do much with builtin radio and other peripherals but it requires a lot of work to implement something like Bluetooth LE stack on top of them. I know this because I tried to do it with moderate success.
Nordic claim that they sell you a Bluetooth LE enabled product but their chip alone doesn’t understand Bluetooth at all. The solution for this “paradox” is a firmware which you can download from Nordic website for free. They called it SoftDevice.
SoftDevice
The SoftDevice isn’t a typical firmware because it runs on the main CPU and shares with your application also SRAM, Flash and other resources like timers and PPI. In this respect it looks more like shared library or rather like an operating system because your code communicate with it using the system calls. On the other hand, it actually resembles some kind of device because it generates hardware interrupts to communicate events to the application. It’s all clever enough that if you have a code that runs on bare metal MCU it still can run with SoftDevice installed. You just have to move it higher in memory which only requires re-linking.
Every SoftDevice version has slightly different memory requirements. The APP_CODE_BASE and the minimum APP_RAM_BASE (see figure below) is specified in the SoftDevice release notes.

The actual APP_RAM_BASE depends on the number of SoftDevice features enabled and is also checked at runtime. The next figure shows the organization of Flash memory in detail, including also the bootloader present on our nRF52840 Dongle.

But let’s leave the theory for now and show it all in practice.
Programming the nRF52840 Dongle
There is a great tutorial on this topic that is definitely worth reading. Here I’ll describe the programming considering the specifics of the Embedded Go.
I assume you’ve read the Getting started article and you have a ready to use Go compiler with support for noos/thumb target. So let’s clone the embeddedgo/nrf5 repository:
cd $HOME/embeddedgo
git clone https://github.com/embeddedgo/nrf5.git
and start with a simple blinky program:
package main

import (
	"time"

	"github.com/embeddedgo/nrf5/devboard/pca10059/board/buttons"
	"github.com/embeddedgo/nrf5/devboard/pca10059/board/leds"
)

func delay() {
	if buttons.User.Read() != 0 {
		time.Sleep(time.Second / 8)
	} else {
		time.Sleep(time.Second / 2)
	}
}

func main() {
	for {
		leds.Blue.SetOff()
		leds.User.SetOn()
		delay()

		leds.User.SetOff()
		leds.Red.SetOn()
		delay()

		leds.Red.SetOff()
		leds.Green.SetOn()
		delay()

		leds.Green.SetOff()
		leds.Blue.SetOn()
		delay()
	}
}
This program blinks all LEDs on the board at a speed dependent on the button state. It definitely doesn’t use Bluetooth so it can run without any SoftDevice installed. But we cannot use the bare metal memory settings:
GOTEXT=0x00000000
GOMEM=0x20000000:256K
because of the MBR (see the figure above) which occupies the first 4 KB of Flash. It also requires 8 bytes of RAM so the memory settings should look like this:
GOTEXT=0x00001000
GOMEM=0x20000008:262136
The build-mbr.sh script contains the correct settings for this case. Let’s use it to compile our application:
cd nrf5/devboard/pca10059/examples/blinky
../build-mbr.sh
As a result, we’ve received not only the usual blinky.elf file but also the blinky.hex file required by the DFU programming tools.
Now we can flash our blinky to the dongle using its bootloader. We will start with nRF Connect for Desktop. In my case it’s a Linux version called nrfconnect-3.3.0-x86_64.AppImage. Download it from Nordic website and run this way:
chmod a+rx nrfconnect-3.3.0-x86_64.AppImage
./nrfconnect-3.3.0-x86_64.AppImage
If you encounter the following error:
[11280:0208/141211.615969:FATAL:setuid_sandbox_host.cc(157)] The SUID sandbox
helper binary was found, but is not configured correctly. Rather than run
without sandboxing I'm aborting now. [...]
add --no-sandbox options to run it without sandboxing or try to find the right solution and share it with us.
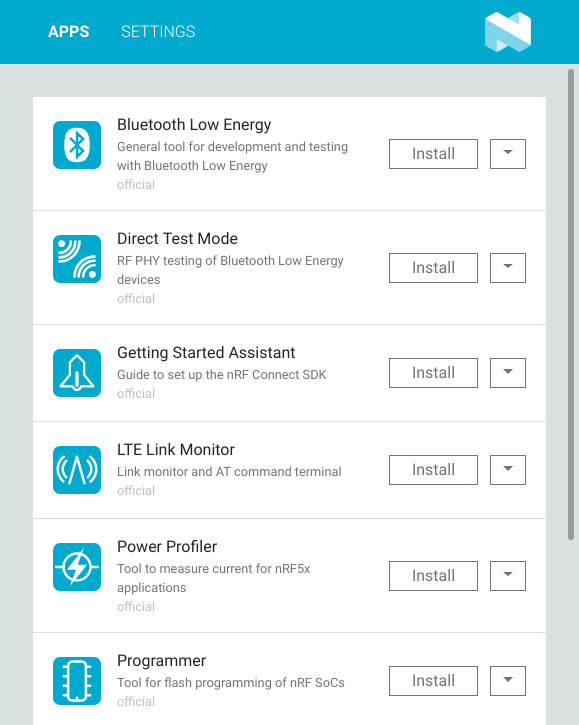
Install the Programmer application and open it.
Insert the dongle into a free USB port and press the Reset button (the board has two buttons: the User button facing up and the Reset button facing to the side). The dongle should start blinking slow the red LED.
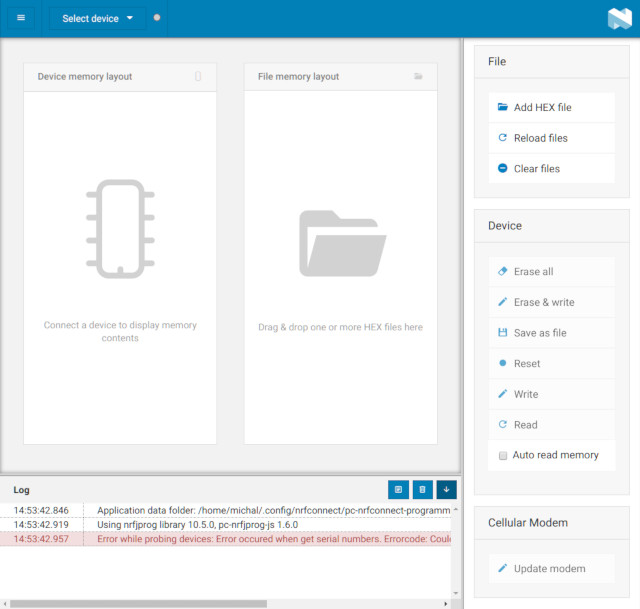
Click the Select device menu. You should see your dongle here. If you don’t see it check your dmesg log. It should look like this:
$ sudo dmesg |tail
[23830.797956] usb 1-1.6.4: new full-speed USB device number 21 using ehci-pci
[23830.909661] usb 1-1.6.4: New USB device found, idVendor=1915, idProduct=521f, bcdDevice= 1.00
[23830.909665] usb 1-1.6.4: New USB device strings: Mfr=1, Product=2, SerialNumber=3
[23830.909676] usb 1-1.6.4: Product: Open DFU Bootloader
[23830.909677] usb 1-1.6.4: Manufacturer: Nordic Semiconductor
[23830.909678] usb 1-1.6.4: SerialNumber: C20AFA9EF7E4
[23830.910046] cdc_acm 1-1.6.4:1.0: ttyACM0: USB ACM device
You can also check the rights to the /dev/ttyACM0:
$ ls -l /dev/ttyACM0
crw-rw---- 1 root dialout 166, 0 lut  8 14:55 /dev/ttyACM0
In this case you need to be in the dialout group or add rights to everyone but it’s a temporary solution.
If you selected your dongle from drop-down menu then its current Flash content should appear on the left side.
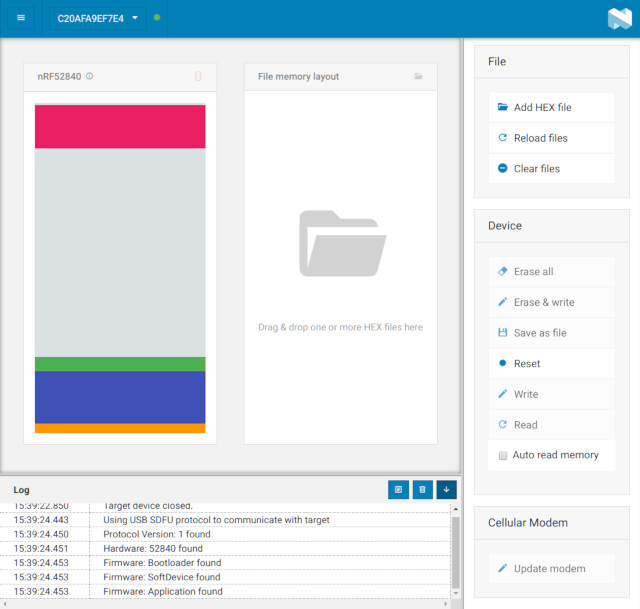
Now we can program our blinky application. Add blinky.hex to the File memory layout using Add HEX file button and click Write. After programming the dongle should start blinking.
Press Reset button to check does the bootloader still work. If it is you can see a new Flash content, without a SoftDevice.
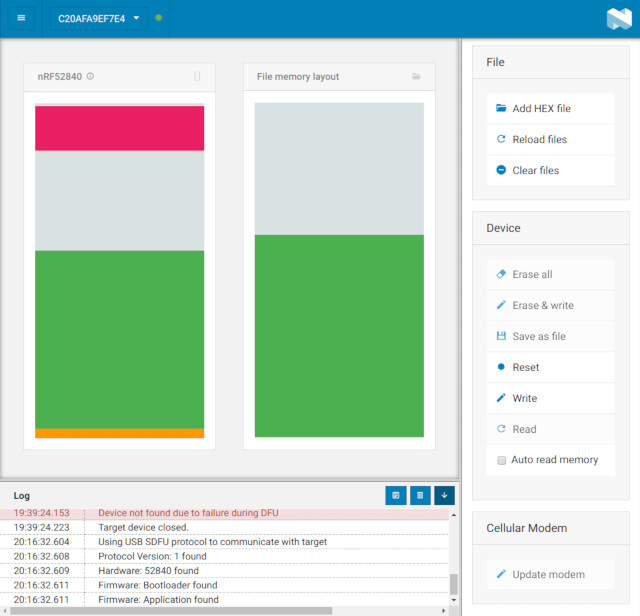
You can see how huge is the binary generated by current Go compiler. But don’t worry. This is a base size because of builtin thread scheduler, goroutine scheduler, memory allocator, garbage collector and some other useful things as well as the symbol table of all that stuff. It doesn’t grow much as you add more and more of your code.
So now you know how to program the nRF52840 Dongle using the nRF Connect programmer. It has its advantages from an educational point of view but it’s not very convenient in everyday use. Fortunately, there is a more useful tool called nrfutil, but we will deal with it later. For now let’s get to the main topic of this article and start to do something with Bluetooth LE.
Bluetooth blinky
Let’s compile and programm a simple BLE blinky application. It’s based on the original Nordic’s ble_app_blinky but uses the SoftDevice API directly (the original one uses nRF5 SDK that provides an event based abstraction layer over the SoftDevice API).
cd $HOME/embeddedgo/nrf5/devboard/pca10059/examples/ble_blinky
../build-s140-7.sh
The build-s140-7.sh script sets GOTEXT and GOMEM variables as required by S140 SoftDevice version 7. You can download the S140 SoftDevice from Nordic website but for convenience it is also included in the embeddedgo/nrf5 repository:
$ ls -o $HOME/embeddedgo/nrf5/softdevice/nordic/s140/hex
-rw-r--r-- 1 michal   1952 sty 16 23:04 s140_nrf52_7.0.1_licence-agreement.txt
-rw-r--r-- 1 michal 438258 sty 16 23:04 s140_nrf52_7.0.1_softdevice.hex
Let’s come back to the nRF Connect programmer, clear the previous file and add the ble_blinky.hex and s140_nrf52_7.0.1_softdevice.hex files. The file memory layout should look like on the image bellow.
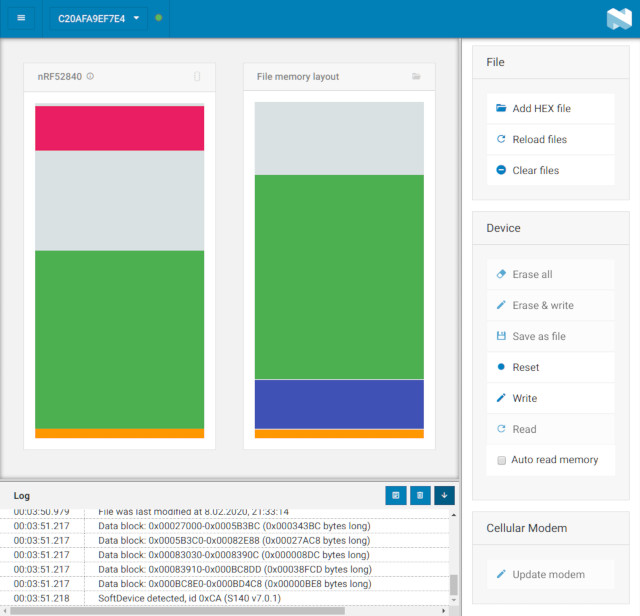
Click Write to start programming. If all went well the dongle will start blinking green LED which means it advertising the Nordic LED Button service. To test it you can use Android or iOS version of nRF Connect. There is also a nRF Blinky application for Android with its source code available on github. The video bellow shows both applications in action.
As you can see you can start to play with Bluetooth LE in Go even today. For now only the raw SoftDevice API is available. A more convenient interface that resembles net or net/http package should be created over it. The SoftDevice supports multiple connections, central and peripheral roles at the same time so a Go programmer expects familiar and easy to use interface that allow to handle multiple connections using multiple goroutines.
Using nrfutil
There is a command line programming tool that is better suited for everyday use. It’s a Python application and you can install it using pip:
pip install nrfutil
Its usage is described in the nRF52840 Dongle Programming Tutorial.
In case of our ble_blinky example you can use it this way:
$ ../load-nrfutil-s140-7.sh

Zip created at ble_blinky.zip
  [####################################]  100%
Device programmed.
OpenOCD
You can use OpenOCD to debug and program the nRF52840 Dongle without affecting MBR, SoftDevice and bootloader. The build script generates required bootloader settings that are programmed with the main binary.
$ ../load-oocd.sh
Open On-Chip Debugger 0.10.0+dev-00362-g78a44055-dirty (2018-03-22-10:14)
Licensed under GNU GPL v2
For bug reports, read
	http://openocd.org/doc/doxygen/bugs.html
debug_level: 0
adapter speed: 1000 kHz
target halted due to debug-request, current mode: Thread
xPSR: 0x01000000 pc: 0x00000a80 msp: 0x20000400
target halted due to debug-request, current mode: Thread
xPSR: 0x01000000 pc: 0x00000a80 msp: 0x20000400
** Programming Started **
auto erase enabled
target halted due to breakpoint, current mode: Thread
xPSR: 0x61000000 pc: 0x2000001e msp: 0x20000400
wrote 618496 bytes from file ble_blinky.hex in 28.774637s (20.991 KiB/s)
** Programming Finished **
target halted due to debug-request, current mode: Thread
xPSR: 0x01000000 pc: 0x00000a80 msp: 0x20000400
** Programming Started **
auto erase enabled
wrote 8192 bytes from file ble_blinky-settings.hex in 0.757974s (10.554 KiB/s)
** Programming Finished **
Setup BLE stack:
- enable softdevice: OK
- configure connection count: OK
- configure role count: OK
- enable BLE stack: OK
- softdevice RAM: required=8960, reserved=10240
- configure device name: OK
- configure connection parameters: OK
- add LED-Button service base UUID: OK
- add LED-Button service: OK
- add Button characteristic: OK
- add LED characteristic: OK
- create advertising set: OK
- start advertising: OK
Handling BLE stack events...
The load-oocd.sh script expects the ST-LINK programmer. If you use an other programming hardware you have to edit this script and set the INTERFACE variable to the right OpenOCD configuration.
Be careful to don’t remove HEX files leaving ELF file in place. If you run load-oocd.sh with only ELF file in the current directory the OpenOCD will program it to the beginning of Flash overwriting the MBR. If it happens to you use OpenOCD to flash the bootloader back this way:
openocd -f interface/stlink.cfg -f target/nrf52.cfg -c "init; reset init; program $HOME/embeddedgo/nrf5/devboard/pca10059/doc/bootloader/bootloader.hex; exit"
Replace the stlink.cfg with the right configuration file for your programmer.
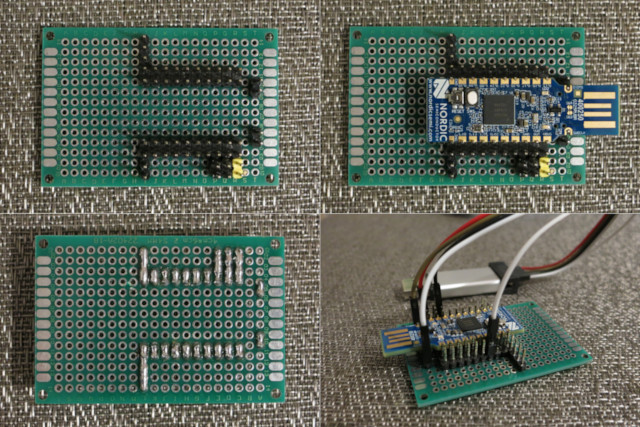
I’ve developed very useful adapter board to easy program, test and debug nRF52 dongles without soldering them. It’s so useful and simple to make that I think it’s worth sharing this idea:
Michał Derkacz