Programming with EVE

There are hundreds of different types of displays targeting the MCU market. From the simplest text only displays based on HD44780 compatible controllers to the Nextion “intelligent” displays that contain their own MCUs and megabytes of RAM.
But there is a series of display controllers that shines among many others. They are product of FTDI, a company well known for their USB to UART converters. Currently there are three generations of these controllers available on the market: FT80x, FT81x and BT81x, all based on the same concept called Embedded Video Engine.
The following two videos are from Gameduino 2/3 Kickstarter campaigns. In the first one James Bowman presents the features of Gameduino 2 the Arduino display shield based on FT800 chip. In the second one you can see the improvements introduced by Gameduino 3 that uses FT810 chip (EVE2).
At the end of this article you can see one demo and one game from the first video. They are translated to Go and can run on any supported MCU.
Embedded Video Engine
EVE is something like GPU for microcontrollers. It provides drawing interface similar to OpenGL 2D and also handles audio and touch functionality.
Unique is the way EVE produces the displayed image. If you think about typical GPU based design you probably think about a specialized processor that executes commands and draws to the large framebuffer. We’re just before connecting a relatively large 800x480 display to the STM32L476 microcontroller. Such display would need about 1.5 MB of graphics RAM for single 32-bit RGBA framebuffer. The STM32L476 has only 128 KB of RAM so the framebuffer must be handled by display controller.
EVE does it for our MCU but uses only 3200 bytes for its internal framebuffer. How is it possible? It’s possible because EVE renders the display list (scene in the OpenGL nomenclature) line by line during the LCD refresh.
The display list can contain up to 2048 commands and is double-buffered in RAM of size 2 x 8 KB. A microcontroller can write basic commands like points, lines, rectangles, bitmaps, etc. directly to the inactive display list or use Co-processor Engine (CE) for high-level commands like drawing buttons, scroll bars, progress bars, text strings, decompressing JPEG or PNG images, etc. The CE executes high-level commands and in effect writes basic display list commands to the inactive display list buffer or decompress data to the general purpose RAM. When the display list is ready the inactive and active buffers are swapped.
There is 1 MB (256 KB in case of FT80x) of general purpose RAM (RAM_G), where you can store bitmaps, decompress JPEG and PNG images, setup video queues, store audio files, etc. As you can see the FT81x uses about 1050 KB of RAM for a lot of things instead of 1500 KB for only one framebuffer (you need two for double buffering).
The EVE handles also touchscreen and audio. You can assign a tag to any object in the display list. The graphics engine will tell you which object is touched by reporting its tag. It can also assists in tracking touches on graphics objects by reporting the angle or distance. Additionally it can play audio generated by simple built-in MIDI synthesizer or play samples from RAM_G.
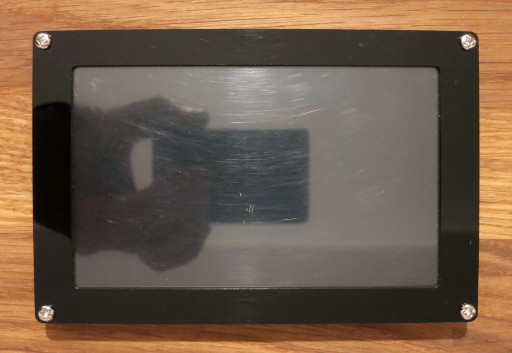
The HOTMCU FT811CB display
HAOYU Electronics aka HOTMCU is probably the cheapest source of FT8xx based displays. When I was working on the display/eve package I’ve used two of them: FT800CB-HY50B and FT811CB-HY50HD. The first one uses EVE1 chip (FT800), the second one uses EVE2 chip (FT811). The eve package autodetects EVE version and supports both. You can see the pictures of the FT811CB bellow:
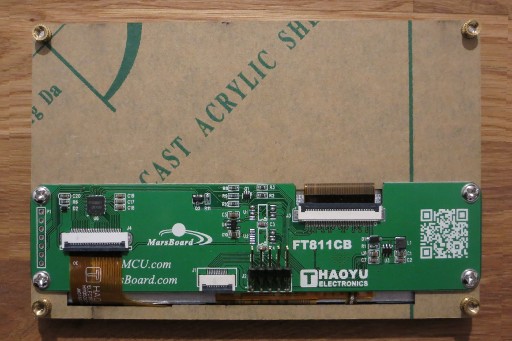
Its TFT panel isn’t outstanding, to put it mildly, but good enough for development purposes.
Unfortunately the displays from HOTMCU are designed to work with 5V logic used by most Arduino boards. They probably work well with 5V logic, even with the highest supported 30 MHz SPI clock but in case of 3.3V logic used by most 32-bit microcontrollers they can’t work reliably with such high speeds. You can use them without any modification but you’ve to reduce the SPI clock much (unfortunately I don’t remember how much).
However, there is a better solution to this problem. You can remove the two 74LVC125A level shifters as shown below:
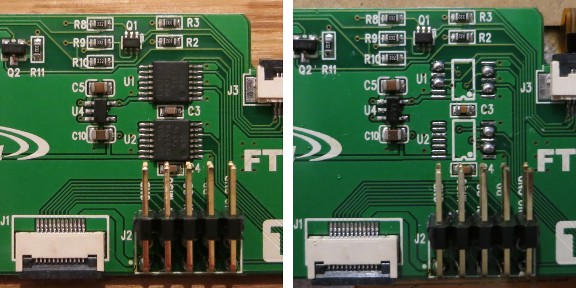
As a side effect this modification allows to use 2-bit QSPI mode which doubles the available bandwidth.
Programming with EVE
Programming with Embedded Video Engine mainly consists of creating display lists. But before you create your first display list you’ve to establish a communication channel with your display. The display/eve package uses DCI interface to communicate with EVE. The stm32/dci/evedci package provides DCI implementation optimized for STM32 microcontrollers.
Let’s connect the FT811CB display to the Nucleo-L476RG development board.

The FT811CB requires 8 wires for GND, 5V, INT, PDN, CSN, SCK, MISO, MOSI signals. There is also AUDIO signal on the header which you can connect to the line input of your audio amplifier or portable speaker.
Now we’ve to reflect these connections in the code.
package main

import (
	"embedded/rtos"

	"github.com/embeddedgo/display/eve"
	"github.com/embeddedgo/stm32/dci/evedci"
	"github.com/embeddedgo/stm32/hal/exti"
	"github.com/embeddedgo/stm32/hal/gpio"
	"github.com/embeddedgo/stm32/hal/irq"
	"github.com/embeddedgo/stm32/hal/spi"
	"github.com/embeddedgo/stm32/hal/spi/spi2"

	_ "github.com/embeddedgo/stm32/devboard/nucleo-l476rg/board/init"
)

var eveInt rtos.Note

func main() {

	// GPIO pins used to connect to FT811CB, all from port B
	pb := gpio.B()
	pb.EnableClock(true)
	intn := pb.Pin(1)
	pdn := pb.Pin(11)
	csn := pb.Pin(12)
	sck := pb.Pin(13)
	miso := pb.Pin(14)
	mosi := pb.Pin(15)

	// connect intn pin to EXTI for detection of EVE interrupts
	evedci.UseIntPin(intn)
	irq.EXTI1.Enable(rtos.IntPrioLowest, 0)

	// connect csn, sck, mosi, miso pins to SPI2
	spi2.UsePinMaster(spi.NSS, csn)
	spi2.UsePinMaster(spi.SCK, sck)
	spi2.UsePinMaster(spi.MOSI, mosi)
	spi2.UsePinMaster(spi.MISO, miso)

	// setup EVE driver
	lcd := eve.NewDriver(evedci.NewSPI(spi2.Driver(), pdn), 256)
	lcd.SetNote(&eveInt)

	// initialize display
	if err := lcd.Init(&eve.Default800x480, nil); err != nil {
		println(err.Error())
		return
	}
	lcd.SetBacklight(96)

	// we will create display lists here
}

//go:interrupthandler
func EXTI1_Handler() {
	exti.L1.ClearPending()
	eveInt.Wakeup()
}
You can follow this article with other supported boards, e.g. compare sample code for STM32F4-Discovery.
Save the above code and create build.sh script to facilitate future builds.
#!/bin/sh

GOTARGET=stm32l4x6
GOMEM=0x20000000:96K,0x10000000:32K
GOTEXT=0x8000000

. $HOME/embeddedgo/scripts/build.sh $@
Now we can try to compile our code:
$ go mod init evetutorial
go: creating new go.mod: module evetutorial
$ chmod a+x build.sh
$ ./build.sh
go: downloading github.com/embeddedgo/stm32 v0.4.4
go: extracting github.com/embeddedgo/stm32 v0.4.4
go: finding github.com/embeddedgo/stm32 v0.4.4
go: downloading github.com/embeddedgo/display v0.1.6
go: extracting github.com/embeddedgo/display v0.1.6
go: finding github.com/embeddedgo/display v0.1.6
Success! But this code doesn’t draw anything on the screen yet. Before we start drawing something we will prepare load.sh script which we will use to write our program to the STM32 Flash:
#!/bin/sh

INTERFACE=stlink
TARGET=stm32l4x
TRACECLKIN=80000000

. $HOME/embeddedgo/scripts/load-oocd.sh
First display list
Let’s create our first display list. Add the following code at the end of the main function:
dl := lcd.DL(-1)
dl.ClearColorRGB(0x0000AA)
dl.Clear(eve.CST)
dl.PointSize(60 * 16)
dl.Begin(eve.POINTS)
dl.Vertex2ii(200, 100, 0, 0)
dl.Vertex2f(500*16, 300*16)
dl.End()
dl.Display()
dl.SwapDL()
Compile it and flash:
./build.sh
chmod a+x load.sh
./load.sh
If everything went well you should see the following image on the screen (real screenshot obtained from FT811 using Snapshot2 command, open it in new tab/window to see original size):
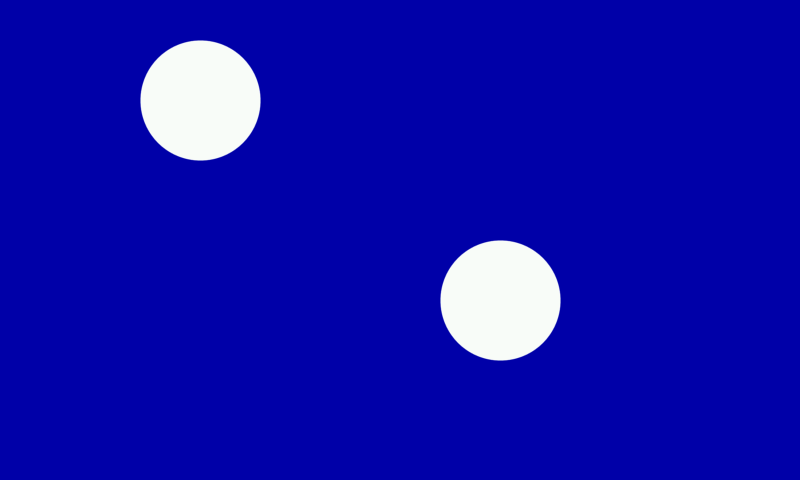
Let’s discuss the above code.
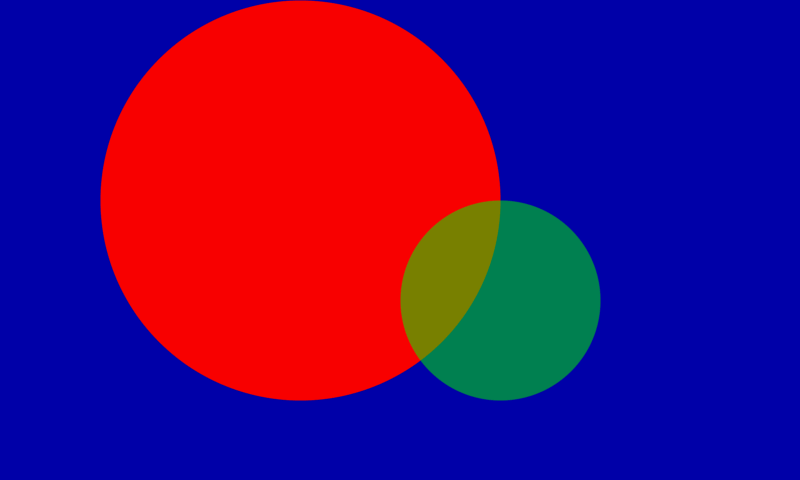
The dl := lcd.DL(-1) begins the writing transaction to the EVE memory. You start write at address passed to the DL method. -1 is the special address that means the beginning of display list buffer (RAM_DL). It also means that DL will wait for scheduled swap to avoid overwriting the previously created display list.
The returned display list writer will be used to write display list commands to RAM_DL.
The ClearColorRGB(0x0000AA) and Clear(eve.CST) commands instruct EVE to fill its single-line frame buffer with the specified color before rendering the next line. If you omit Clear command you will obtain the following image on the screen:

This image says a lot about how the rendering is done.
Our display list draws two points on the screen. The PointSize(60 * 16) command specifies radius of the following points in 1/16 pixel precision. In the subsequent display lists we use f(x) instead of x * 16 where f is defined as:
func f(x int) int { return x * 16 }
This increases the readability of the presented code.
The Begin(eve.POINTS) tells the graphics engine to start drawing points. The following vertex commands draw points with the given coordinates. There are two kinds of vertex commands.
The first one is Vertex2ii which accept four arguments. First two are x ,y coordinates and the next two allow to specify bitmap handle and cell (more about them later). The second one is Vertex2f which accepts only two arguments which are x, y coordinates in 1/16 pixel precision.
The Vertex2ii x, y coordinates can be in the range 0 to 511 only. It’s a significant disadvantage in the case of 800x480 display. Despite this you can use Vertex2ii to draw on the whole screen (useful in case of bitmaps) thanks to the VertexTranslateX and VertexTranslateY commands.
The End() command closes the drawing block started by Begin. It can be omitted in most cases.
The graphics engine executes commands until it encounters the Diaplay command so this command ends our display list.
The SwapDL() isn’t an EVE command. It’s equivalent to the following sequence:
dl.Close()
lcd.ClearInt(eve.IntSwap)
lcd.WriteReg(eve.REG_DLSWAP, eve.DLSWAP_FRAME)
It closes the write transaction, clears the IntSwap interrupt flag and schedules the display list swap after the current frame is scanned out. SwapDL doesn’t wait for the display list swap to be done so your code can start calculation for the next display frame immediately, while the previous frame is still scanned out and the new one is waiting for swap.
Color and transparency
You can specify the size, color and transparency before each vertex. They are part of graphics context (more about this later).
dl := lcd.DL(-1)
dl.ClearColorRGB(0x0000AA)
dl.Clear(eve.CST)

dl.Begin(eve.POINTS)
dl.ColorRGB(0xFF0000)
dl.PointSize(f(200))
dl.Vertex2f(f(300), f(200))
dl.ColorRGB(0x00FF00)
dl.ColorA(128)
dl.PointSize(f(100))
dl.Vertex2f(f(500), f(300))

dl.Display()
dl.SwapDL()
Other graphics primitives
The Begin command accepts the following graphics primitives: BITMAPS, POINTS, LINES, LINE_STRIP, EDGE_STRIP_R, EDGE_STRIP_L, EDGE_STRIP_A, EDGE_STRIP_B, RECTS. The following display list demonstrates some of them:
dl.Begin(eve.BITMAPS)
dl.Vertex2ii(20, 20, 31, 'A')
dl.BitmapHandle(29)
for i := 0; i < 25; i++ {
	dl.Cell(byte('B' + i))
	dl.Vertex2f(f(60+25*i), f(20))
}

dl.Begin(eve.LINES)
dl.LineWidth(f(1))
dl.Vertex2f(f(20), f(100))
dl.Vertex2f(f(200), f(100))
dl.LineWidth(f(5))
dl.Vertex2f(f(20), f(150))
dl.Vertex2f(f(200), f(150))
dl.LineWidth(f(10))
dl.Vertex2f(f(20), f(200))
dl.Vertex2f(f(200), f(200))

dl.Begin(eve.LINE_STRIP)
dl.LineWidth(f(1))
dl.Vertex2f(f(600), f(100))
dl.Vertex2f(f(780), f(100))
dl.LineWidth(f(5))
dl.Vertex2f(f(600), f(150))
dl.Vertex2f(f(780), f(150))
dl.LineWidth(f(10))
dl.Vertex2f(f(600), f(200))
dl.Vertex2f(f(780), f(200))

dl.Begin(eve.EDGE_STRIP_B)
dl.ColorRGB(0xFFFF00)
dl.Vertex2f(f(100), f(400))
dl.Vertex2f(f(300), f(350))
dl.Vertex2f(f(500), f(450))
dl.Vertex2f(f(700), f(320))

dl.Begin(eve.RECTS)
dl.ColorRGB(0xFF0000)
dl.Vertex2f(f(250), f(100))
dl.Vertex2f(f(550), f(300))
dl.ColorRGB(0x00FF00)
dl.LineWidth(f(1))
dl.Vertex2f(f(300), f(150))
dl.Vertex2f(f(500), f(250))
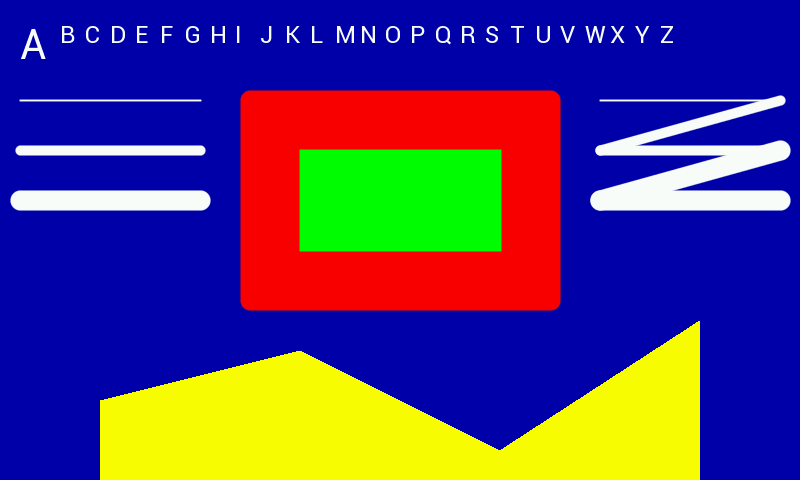
Although the number of available primitives is small, however along with the other display list commands such as bitmap transformations, blending, scissors and stencils it gives you immense possibilities for creating images.
Bitmaps
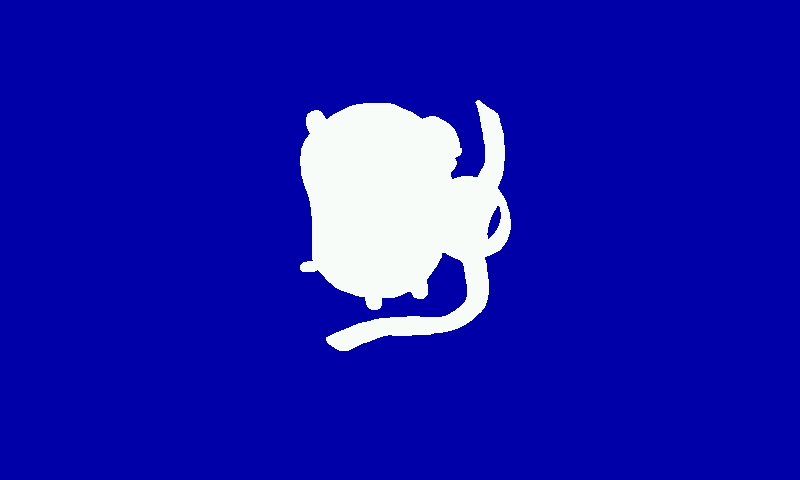
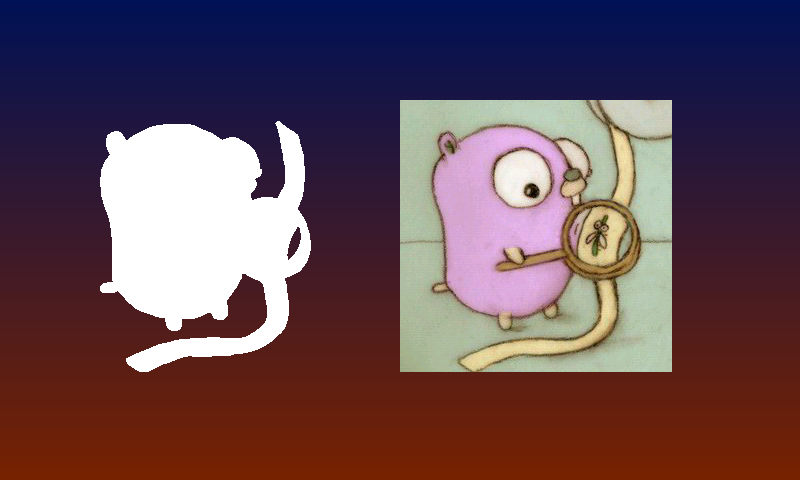
As you can see in the example above, the built-in fonts are bitmaps saved in ROM. But we can load other bitmaps to the RAM_G and display them just like fonts.
You can find an example of L1 bitmap in the display/eve/examples/evetest/gophermask.go file. It’s stored in the long Go string. In case of lack of external storage like SD card it’s perfectly fine to store bitmaps this way. There are other things like assets with display list commands which you would prefer to have in uint32 arrays. But there is no way in the current Go specification to leave the immutable data other than strings in the Flash. See the immutable data proposal for more information about this topic.
Let’s copy the display/eve/examples/evetest/gophermask.go file to our project directory and change its package name to main. Now we can load gopherMask bitmap string to the RAM_G and display it on the screen.
dl := lcd.DL(0)
dl.WriteString(gopherMask)
dl.Close()

dl = lcd.DL(-1)
dl.BitmapHandle(1)
dl.BitmapSource(0)
dl.BitmapLayout(eve.L1, 216/8, 251)
dl.BitmapSize(eve.DEFAULT, 211, 251)
dl.Display()
dl.SwapDL()

dl = lcd.DL(-1)
dl.ClearColorRGB(0x0000AA)
dl.Clear(eve.CST)
dl.Begin(eve.BITMAPS)
dl.BitmapHandle(1)
dl.Vertex2f(f(300), f(100))
dl.Display()
dl.SwapDL()
The code above consists of three write transactions. The first one transfers our bitmap to the RAM_G. The second one creates the display list that tells the graphics engine about our bitmap and assigns handle to it. The third transaction creates the display list that draws our bitmap on the screen.
The last two transactions can be merged into one:
dl = lcd.DL(-1)
dl.BitmapHandle(1)
dl.BitmapSource(0)
dl.BitmapLayout(eve.L1, 216/8, 251)
dl.BitmapSize(eve.DEFAULT, 211, 251)
dl.ClearColorRGB(0x0000AA)
dl.Clear(eve.CST)
dl.Begin(eve.BITMAPS)
dl.BitmapHandle(1)
dl.Vertex2f(f(300), f(100))
dl.Display()
dl.SwapDL()
but the previous example shows that the bitmap defined by one display list can be used by another one. This is an example of the global graphics state. Every display list has also its local state called graphics context. The graphics context contains attributes like color, line width, point size, bitmap handle, bitmap cell, bitmap transform coefficients, etc. You can save and restore the current graphics context on the context stack using SaveContext and RestoreContext commands.
You select the bitmap to draw using handle assigned to it. There are 15 handle numbers from 0 to 14 available for programmer. The handle 15 is used as scratch bitmap handle by co-processor engine and handles from 16 to 31 are used for built-in fonts. One handle can represent multiple bitmaps with the same layout located in the memory one after another. The cell parameter is used to select one of them.
Our bitmap is an example of the L1 format where every pixel can be only opaque or transparent. But we can draw it in different colors:
dl.Begin(eve.BITMAPS)
dl.BitmapHandle(1)
dl.ColorRGB(0xFFFF00)
dl.Vertex2f(f(250), f(100))
dl.ColorRGB(0x00FFFF)
dl.Vertex2f(f(300), f(100))
dl.ColorRGB(0xFF0000)
dl.ColorA(128)
dl.Vertex2f(f(350), f(100))
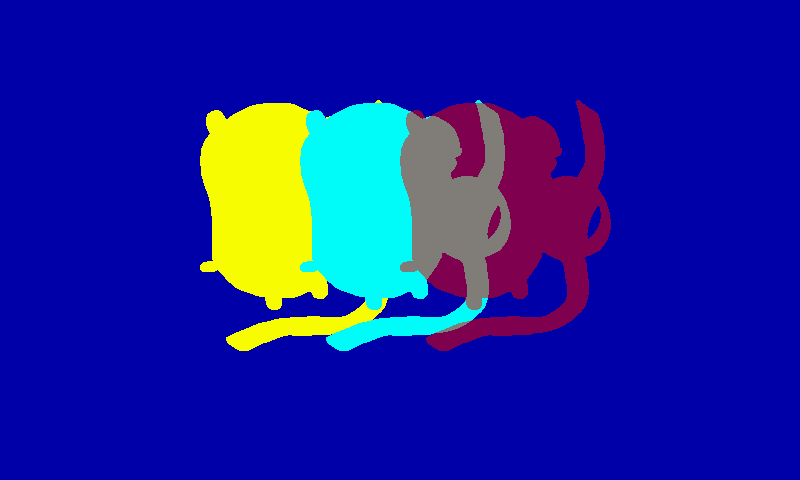
You can scale, rotate and translate bitmaps by changing coefficients of transform matrix. Below we draw the first bitmap scaled down and the other two rotated 45 degrees.
s := int(256 * math.Sin(math.Pi/4))
c := int(256 * math.Cos(math.Pi/4))

dl = lcd.DL(-1)
dl.ClearColorRGB(0x0000AA)
dl.Clear(eve.CST)
dl.Begin(eve.BITMAPS)
dl.BitmapHandle(1)
dl.ColorRGB(0xFFFF00)
dl.BitmapTransformA(0, 2*256)
dl.BitmapTransformE(0, 2*256)
dl.Vertex2f(f(200), f(100))
dl.BitmapTransformA(0, c)
dl.BitmapTransformB(0, -s)
dl.BitmapTransformD(0, s)
dl.BitmapTransformE(0, c)
dl.ColorRGB(0x00FFFF)
dl.Vertex2f(f(300), f(100))
dl.ColorRGB(0xFF0000)
dl.ColorA(128)
dl.Vertex2f(f(400), f(100))
dl.Display()
dl.SwapDL()
The scaling and rotation invariant is the upper left corner of the bitmap. If you want to rotate bitmap around the center of the original image you need to translate it before rotation and translate it back after rotation. This all can be expressed by one transform matrix but the formula for coefficients will be more complicated. Fortunately, EVE has a graphics co-processor that facilitates many things including rotating and scaling bitmaps.
Graphics co-processor
So far we’ve been writing display lists directly to RAM_DL. But we can also send the display list commands to the co-processor engine. It will write the received commands to RAM_DL anyway. So what’s the profit from using it for this? There is no any profit if you send DL commands only but it gives you ability to mix co-processor commands with DL commands which makes your job easier.
Let’s write the last example one more time but now using co-processor engine and doing scaling and rotation relative to the center of the bitmaps.
dx := 211 << 16 / 2
dy := 251 << 16 / 2
scale := 1 << 16 / 2
angle := 0x10000 / 8

ce := lcd.CE(-1)
ce.DLStart()
ce.ClearColorRGB(0x0000AA)
ce.Clear(eve.CST)
ce.Begin(eve.BITMAPS)

ce.BitmapHandle(1)
ce.ColorRGB(0xFFFF00)
ce.LoadIdentity()
ce.Translate(dx, dy)
ce.Scale(scale, scale)
ce.Translate(-dx, -dy)
ce.SetMatrix()
ce.Vertex2f(f(200), f(100))

ce.ColorRGB(0x00FFFF)
ce.Translate(dx, dy)
ce.Rotate(angle)
ce.Translate(-dx, -dy)
ce.SetMatrix()
ce.Vertex2f(f(300), f(100))

ce.ColorRGB(0xFF0000)
ce.ColorA(128)
ce.Translate(dx, dy)
ce.Rotate(angle)
ce.Translate(-dx, -dy)
ce.SetMatrix()
ce.Vertex2f(f(400), f(100))

ce.Display()
ce.Swap()
ce.Close()
The actual transformation is a composition of all previous transformations. Use LoadIdentity command to start from the identity matrix.
Translate and Rotate commands affect the internal co-processor state only. You’ve to use SetMatrix command to write appropriate BitmapTransformA-F commands to RAM_DL.
JPEG images
The co-processor engine has the ability to decompress JPEG images. We will use it in the example below.
w := lcd.W(0)
w.WriteString(gopherMask)
addr := w.Close()

ce := lcd.CE(-1)
ce.DLStart()

ce.BitmapHandle(1)
ce.BitmapSource(0)
ce.BitmapLayout(eve.L1, 216/8, 251)
ce.BitmapSize(eve.DEFAULT, 211, 251)

ce.BitmapHandle(2)
ce.LoadImage(addr, eve.OPT_RGB565)
ce.WriteString(gopher)
ce.Align(4)

ce.Gradient(0, 0, 0x001155, 0, 480, 0x772200)
ce.Begin(eve.BITMAPS)
ce.BitmapHandle(1)
ce.Vertex2f(f(100), f(121))
ce.BitmapHandle(2)
ce.Vertex2f(f(400), f(100))

ce.Display()
ce.Swap()
ce.Close()
The gopher string contains JPEG image. You can find it in the display/eve/examples/evetest/gopher.go file. The LoadImage(addr, eve.OPT_RGB565) co-processor command decompress it into RAM_DL just above the gopherMask bitmap. It also generates appropriate BitmapSource, BitmapLayout and BitmapSize display list commands. The JPEG string is sent to the co-processor engine immediately after LoadImage command. CE commands must be 4-byte aligned so we use Align(4) to ensures this for the next command.
The Gradient(0, 0, 0x001155, 0, 480, 0x772200) co-processor command draws vertical gradient on the whole screen. In this case we don’t need the Clear command.
Alpha compositing
The EVE renders display list into one-line RGBA color buffer. The alpha channel isn’t visible on the screen but can be used in many ways while drawing. One use case is to use one bitmap to simulate an alpha channel in the another bitmap that doesn’t have it.
Let’s modify the next to last paragraph of the previous example as shown below.
ce.Gradient(0, 0, 0x001155, 0, 480, 0x772200)
ce.Begin(eve.BITMAPS)
ce.ColorMask(eve.A)
ce.Clear(eve.C)
ce.BitmapHandle(1)
ce.Vertex2f(f(231), f(121))
ce.ColorMask(eve.RGBA)
ce.BlendFunc(eve.DST_ALPHA, eve.ONE_MINUS_DST_ALPHA)
ce.BitmapHandle(2)
ce.Vertex2f(f(200), f(100))

The ColorMask(eve.A) disables drawing on the red, green and blue channels so the Clear(eve.C) apply only to the alpha channel same as Vertex2f(f(231), f(121)) which draws gopherMask bitmap to the alpha channel only. After that the ColorMask(eve.RGBA) command restores the default state.
The Vertex2f(f(200), f(100)) draws the gopher bitmap using the blending factors set by the BlendFunc(eve.DST_ALPHA, eve.ONE_MINUS_DST_ALPHA) command. As a result, the gopherMask drawn in the alpha channel determines what is visible from the gopher bitmap.
EVE calculates the pixel color using the following formula:
screenColor = srcFactor*drawColor + dstFactor*screenColor
where drawColor is the pixel color of the object being drawn.
The BlendFunc command changes srcFactor and dstFactor. The initial state is:
srcFactor = drawColor.Aplha     // eve.SRC_ALPHA constant
dstFactor = 1 - drawColor.Aplha // eve.ONE_MINUS_SRC_ALPHA constant
which means that the source alpha channel determines the transparency of the drawn object.
There are six possible factor constants:
ZERO                 // 0
ONE                  // 1
SRC_ALPHA            // drawColor.Aplha
DST_ALPHA            // screenColor.Alpha
ONE_MINUS_SRC_ALPHA  // 1 - drawColor.Aplha
ONE_MINUS_DST_ALPHA  // 1 - screenColor.Alpha
Touchscreen
The FT811CB display supports up to five touches to be read. The following code demonstrates this ability.
w := lcd.W(0)
w.WriteString(gopherMask)
addr := w.Close()

ce := lcd.CE(-1)
ce.DLStart()
ce.BitmapHandle(1)
ce.BitmapSource(0)
ce.BitmapLayout(eve.L1, 216/8, 251)
ce.BitmapSize(eve.DEFAULT, 211, 251)
ce.BitmapHandle(2)
ce.LoadImage(addr, eve.OPT_RGB565)
ce.WriteString(gopher)
ce.Align(4)
ce.Display()
ce.Close()

ramdl := lcd.MemMap().RAM_DL
drawGopher := ramdl.Size - 16*4
for i := 0; i < 2; i++ {
	lcd.WaitInt(eve.IntSwap)
	dl := lcd.DL(ramdl.Start + drawGopher)
	dl.SaveContext()
	dl.Begin(eve.BITMAPS)
	dl.BitmapHandle(28)
	dl.Vertex2f(f(-60), f(-55))
	dl.ColorMask(eve.A)
	dl.Clear(eve.C)
	dl.Cell(0)
	dl.BitmapHandle(1)
	dl.Vertex2f(f(-70), f(-251))
	dl.ColorMask(eve.RGBA)
	dl.BlendFunc(eve.DST_ALPHA, eve.ONE_MINUS_DST_ALPHA)
	dl.BitmapHandle(2)
	dl.Vertex2f(f(-70-31), f(-251-21))
	dl.End()
	dl.RestoreContext()
	dl.Return()
	dl.SwapDL()
}

lcd.WriteReg(eve.REG_CTOUCH_EXTENDED, 0) // multi-touch detection mode

for {
	touches := [5]uint32{
		lcd.ReadReg(eve.REG_CTOUCH_TOUCH0_XY),
		lcd.ReadReg(eve.REG_CTOUCH_TOUCH1_XY),
		lcd.ReadReg(eve.REG_CTOUCH_TOUCH2_XY),
		lcd.ReadReg(eve.REG_CTOUCH_TOUCH3_XY),
		lcd.ReadReg(eve.REG_CTOUCH_TOUCH4_X)<<16 |
			lcd.ReadReg(eve.REG_CTOUCH_TOUCH4_Y)&0xFFFF,
	}
	ce := lcd.CE(-1)
	ce.DLStart()
	ce.Gradient(0, 0, 0x001155, 0, 480, 0x772200)
	for n, touch := range touches {
		if touch != 0x80008000 {
			ce.Cell('1' + n)
			ce.VertexTranslateX(f(int(touch >> 16)))
			ce.VertexTranslateY(f(int(touch & 0xFFFF)))
			ce.Call(drawGopher)
		}
	}
	ce.Display()
	ce.Swap()
	ce.Close()
}
EVE supports something like procedure/function calling. The above code uses this feature. It writes the gopher drawing procedure to the end of both display list buffers only once during initialization. Then the Call command is used to call it.
The procedure starts with the SaveContext command and ends with the RestoreContext followed by Return command. You cannot pass any arguments to the procedure but you can influence the operation of the procedure by modifying the graphics context. The above code modifies graphics context using the VertexTranslateX/Y and Cell commands to draw gophers in different places on the screen together with the touch number.
Touch tag
You can specify a touch tag for graphics objects in the display list. You can think of it as the fourth component of RGBAT color. Graphics engine can report the tag value of the point on the screen which is being touched just like it can determine its color.
Let’s replace the second for loop in the previous example with the following code.
for {
	tag := lcd.TouchTag()

	ce := lcd.CE(-1)
	ce.DLStart()
	ce.Gradient(0, 0, 0x001155, 0, 480, 0x772200)

	ce.TextString(400, 30, 31, eve.OPT_RIGHTX, "Tag:")
	ce.Number(410, 30, 31, eve.DEFAULT, tag)

	ce.Tag(1)
	ce.Cell('1')
	ce.VertexTranslateX(f(180))
	ce.VertexTranslateY(f(400))
	ce.Call(drawGopher)

	ce.Tag(2)
	ce.Cell('2')
	ce.VertexTranslateX(f(550))
	ce.VertexTranslateY(f(400))
	ce.Call(drawGopher)

	ce.Display()
	ce.Swap()
	ce.Close()
}
As you can see in the video above the TouchTag function returns 0 if there is no touch. The initial tag is 255 just like the initial color is white and the initial alpha is 255. Therefore the touch on the background gradient reports 255.
You can set the tag for empty screen using Clear(eve.CST) (C means color, S - stencil, T - tag). There is also ClearTag command which does for tag bufer what the ClearColorRGB does for color buffer.
Widgets
You can use co-processor engine to draw some predefined widgets. The code below presents most of them.
ce := lcd.CE(-1)
ce.DLStart()
ce.Gradient(0, 0, 0x001155, 0, 480, 0x772200)
ce.TextString(ce.Width()/2, 30, 31, eve.OPT_CENTER, "Widgets:")
ce.ButtonString(20, 70, 120, 60, 28, eve.DEFAULT, "Button")
ce.Clock(100, 280, 80, eve.DEFAULT, 13, 25, 46, 0)
ce.Gauge(290, 280, 80, eve.DEFAULT, 6, 3, 43, 100)
ce.Progress(540, 70, 200, 20, eve.DEFAULT, 43, 100)
ce.Scrollbar(540, 120, 200, 20, eve.DEFAULT, 43, 33, 100)
ce.Slider(540, 170, 200, 20, eve.DEFAULT, 43, 100)
ce.Dial(640, 300, 60, eve.DEFAULT, 30000)
ce.KeysString(20, 420, 400, 40, 30, eve.DEFAULT, "ABCDEFGHIJK")
ce.ToggleString(600, 420, 70, 29, eve.DEFAULT, true, "no\xFFyes")
ce.Spinner(400, 200, eve.DEFAULT, 0)
ce.Close()

Note the lack of Display and Swap commands. The Spinner command ends our display list. The co-processor engine overlays the spinner on the current display list and continuously animates until it receives Stop command. There are other commands that work this way: Sketch, Screensaver.
More about programming with EVE
This article does not exhaust the topic. You should definitely read the Gameduino 2 book which gives you a lot of practical knowledge. Its worth reading before the official programming guide.
The BT81X Series Programming Guide is an official guide which you must have on hand when you programming with EVE. It gives you all details about EVE features. You don’t have to read it from cover to cover in particular not before the Gameduino book.
Bonus
The display/eve package contains some examples including two ones translated from Gameduino C++ to Go.
The first one animates 2001 sprites on the screen. See the original description.
The second one is the NightStrike game (original description).
They are written for 480x272 display.
Michał Derkacz