Running Go HTTP server on Teensy 4.1
Updated 2025-08-20: use egtool instead of emgo
Since its first release in 2009, the Go language has been closely associated with network programming. Unfortunately, until now the Embedded Go had no networking capabilities, mainly due to the strong dependency of the net package on the network capabilities of the underlying operating system. But that has changed.
Hardware
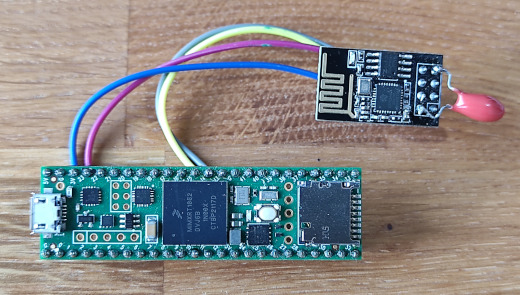
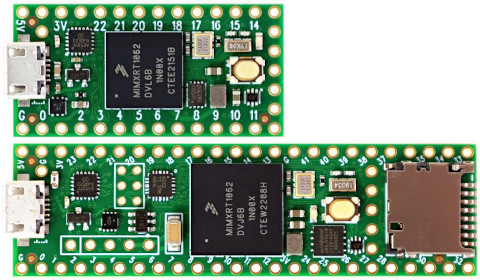
As a hardware platform, we use the Teensy 4.1 development board. The code presented here should also run on Teensy 4.0 without any modifications. The exception, unfortunately, is the titular HTTP server, which does not fit into its smaller Flash.
As a network interface, we use the ESP-01S module. It is easily available, cheap and sufficient for our needs.
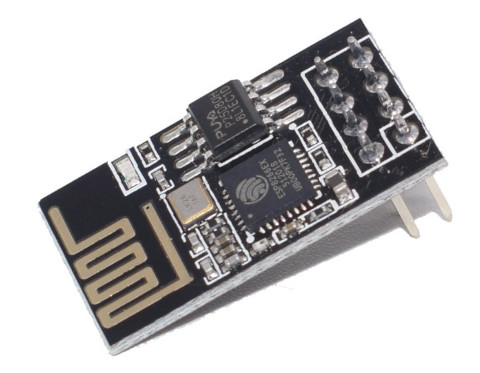
You can use any other ESP8266 or ESP32 based development board provided you flash it with the ESP-AT firmware.
The ESP-AT firmware gives us what the operating system provides for a typical Go application. Instead of using system calls, our programs will talk to the ESP-AT firmware using an UART interface and a rather weird protocol based on Hayes AT commands. All these details will be invisible to us thanks to the espat package. Moreover, the espat/espnet package will provide our application the interface compatible with the standard net package, so any code that uses net.Conn or net.Listener can work with it.
First steps with Teensy and Go
If you have the required hardware and want to test the code presented below, you need to install the latest release of Embedded Go. Detailed instruction can be found on the Getting Started page.
Let’s create a folder, say teensyApp, go into it and create the following two files:
main.go
package main

import (
	"time"

	"github.com/embeddedgo/imxrt/devboard/teensy4/board/leds"
)

func main() {
	for {
		leds.User.Toggle()
		time.Sleep(time.Second)
	}
}
go.env
GOTOOLCHAIN=go1.24.5-embedded
GOOS=noos
GOARCH=thumb
GOARM=7,hardfloat
GOFLAGS=-tags=imxrt1060 '-ldflags=-stripfn=1 -M=0x20200000:992K -F=0x60002000:7928K'
The main.go file contains a simple Go program that blinks the onboard LED. We’ll use it to test our development environment.
The go.env file contains the build options for Teensy 4.1. They also work for Teensy 4.0 but to be consistent with the true size of its Flash you should set -F option to 0x60002000:1976K.
Set the GOENV environment variable to the path of your go.env file.
Run the go mod init and go mod tidy commands to initialize your new “project”.
$ go mod init teensyApp
go: creating new go.mod: module teensyApp
go: to add module requirements and sums:
	go mod tidy
$ go mod tidy
go: downloading github.com/embeddedgo/imxrt v0.0.5
go: finding module for package github.com/embeddedgo/fs/termfs
go: found github.com/embeddedgo/fs/termfs in github.com/embeddedgo/fs v0.1.0
These two commands create the go.mod and go.sum files in our folder and install dependencies.
Now you can build yout first program.
$ go build
Go compiler is silent, so there is no any message if everything went well. You should find the result of compilation in the teensyApp.elf file.
Programming the board
Connect your Teensy board to your PC using a USB cable and press the onnboard button (Teensy should start blinking its red LED). Now you can load and run your program.
$ egtool load
The program should start blinking the yellow LED.
Getting started with the ESP-01S module
Once we have a ready and tested development environment, we can get to the point of this tutorial article.
Let’s connect the Wi-Fi module to the Teensy board, according to the table below.
| ESP-01S | Teensy 4.x |
|---|---|
| RX | 14 |
| TX | 15 |
| GND | G |
| 3V3 | 3V |
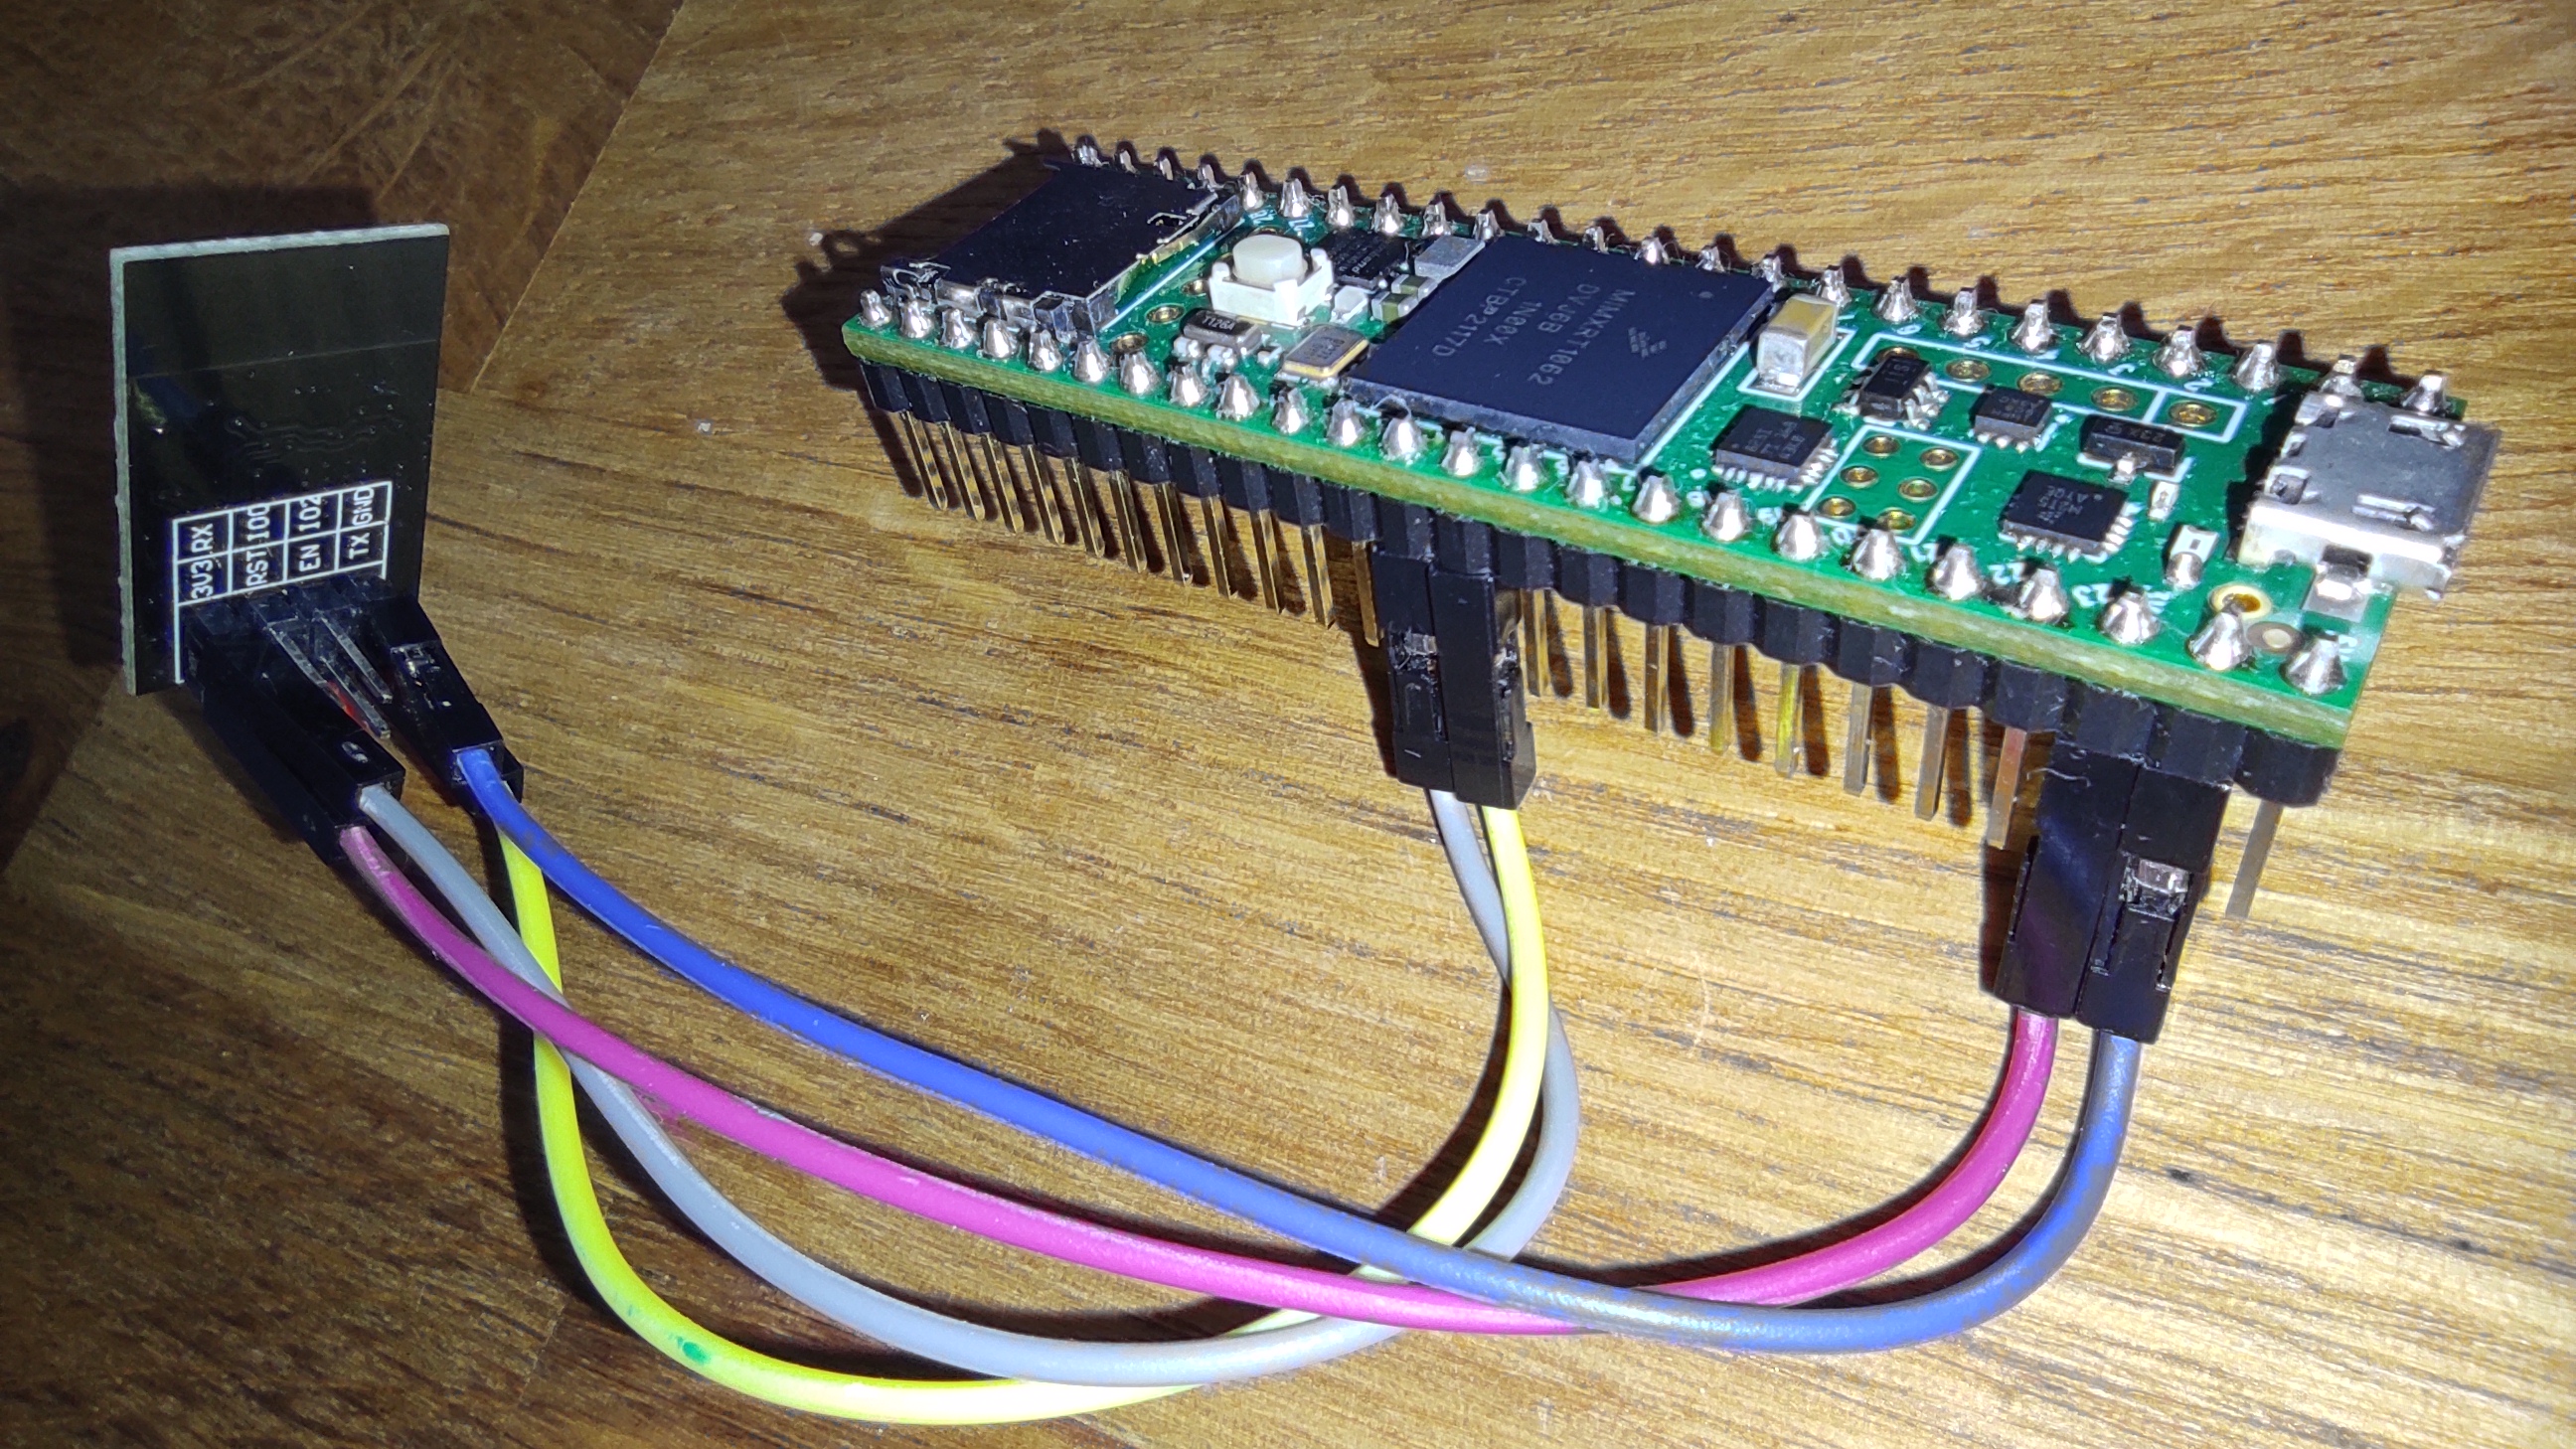
Because of the limited power capabilities of the Teensy 3V pin (250 mA) and rather long connections the ESP-01S module requires a slight hardware modification.
The simplest way to meet the momentary power demand of ESP8266 is to store the energy in the properly sized decoupling capacitor. A 100 µF low-ESR electrolytic capacitor between GND and 3V3 should be just right.
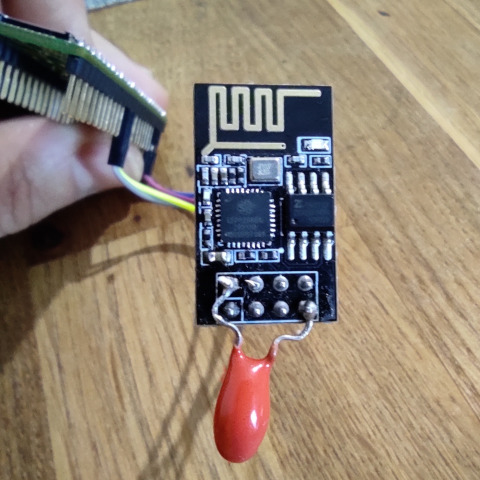
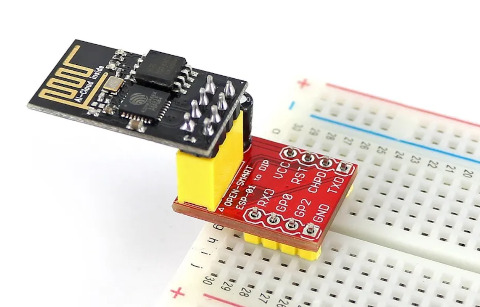
Alternatively you can purchase a breadboard adapter that already includes a proper decoupling capacitor and assemble everything securely on the breadboard.
First program
The first program will display a list of the names (SSIDs) of nearby wireless networks.
package main

import (
	"fmt"
	"time"

	"github.com/embeddedgo/espat"
	"github.com/embeddedgo/imxrt/hal/lpuart"
	"github.com/embeddedgo/imxrt/hal/lpuart/lpuart2"

	"github.com/embeddedgo/imxrt/devboard/teensy4/board/pins"
)

func fatalErr(err error) {
	for err != nil {
		fmt.Println("error:", err.Error())
		time.Sleep(time.Second)
	}
}

func main() {
	// Initialize LPUART2 on pins 14 and 15.
	u := lpuart2.Driver()
	u.Setup(lpuart.Word8b, 115200)
	u.UsePin(pins.P14, lpuart.TXD)
	u.UsePin(pins.P15, lpuart.RXD)
	u.EnableRx(512)
	u.EnableTx()

	// Give the user time to connect to the USB console.
	time.Sleep(5 * time.Second)

	fmt.Print("Initializing Wi-Fi module... ")
	dev := espat.NewDevice("esp0", u, u)
	fatalErr(dev.Init(true))
	fmt.Println("OK")

	// Print the ESP-AT version information.
	s, err := dev.CmdStr("+GMR")
	fatalErr(err)
	fmt.Println(s)

	// Periodically print information about available Wi-Fi networks.
	for {
		fmt.Println("Nearby wireless networks:")
		s, err := dev.CmdStr("+CWLAP")
		fatalErr(err)
		fmt.Println(s)
		time.Sleep(5 * time.Second)
	}
}
The above code first issues the AT+GMR command to print on the USB console the information about the ESP-AT firmware. Then, it periodically issues the AT+CWLAP command to print information about the available WI-FI networks.
Let’s build it.
$ go build
main.go:7:2: missing go.sum entry for module providing package github.com/embeddedgo/espat (imported by teensyApp); to add:
	go get teensyApp
$ go get teensyApp
go: downloading github.com/embeddedgo/espat v0.2.3
$ go build
Now press the button on your Teensy to program it.
$ egtool load
If you quickly enough connect to the Teensy USB console, you should see the following output from this program:
$ picocom -q /dev/ttyACM0
Initializing Wi-Fi module... OK
AT version:2.2.0.0(s-b097cdf - ESP8266 - Jun 17 2021 12:58:29)
SDK version:v3.4-22-g967752e2
compile time(6800286):Jul 11 2021 11:09:32
Bin version:2.2.0(ESP8266_1MB)

Nearby wireless networks:
+CWLAP:(3,"IOT",-63,"76:4d:28:21:11:83",1,-1,-1,4,4,7,1)
+CWLAP:(3,"Home",-64,"74:4d:28:21:11:83",1,-1,-1,4,4,7,1)
+CWLAP:(3,"IOT",-78,"2e:c8:1b:11:22:bb",5,-1,-1,4,4,6,0)
+CWLAP:(3,"Home",-78,"2c:c8:1b:11:22:bb",5,-1,-1,4,4,6,0)

Nearby wireless networks:
+CWLAP:(3,"IOT",-65,"76:4d:28:21:11:83",1,-1,-1,4,4,7,1)
+CWLAP:(3,"Home",-67,"74:4d:28:21:11:83",1,-1,-1,4,4,7,1)
+CWLAP:(3,"IOT",-75,"2e:c8:1b:11:22:bb",5,-1,-1,4,4,6,0)
+CWLAP:(3,"Home",-82,"2c:c8:1b:11:22:bb",5,-1,-1,4,4,6,0)
As you can see, my Teensy sees two Wi-Fi networks provided by four access points.
USB console
If you connect a programmed Teensy board to your computer, it’s seen as a composite USB device that comprises two CDC-ACM (virtual Serial) devices (ports). The first one is used as the USB console, the second one can be used by your program in any way you want. This default USB configuration is performed when you import the devboard/teensy4/board/system package or any other package from the devboard/teensy4/board directory (in our case it’s the pins package).
If you want a custom USB configuration, you cannot import anything from devboard/teensy4/board. Instead, you have to recreate all the things you need from this directory in your application, especially the system package.
You can interact with the USB console using a terminal emulator program like PuTTY on Windows or picocom on Linux or Mac.
Connecting to the network
Our next program will ask for the network name (SSID) and password to connect to the Wi-Fi network.
package main

import (
	"fmt"
	"time"

	"github.com/embeddedgo/espat"
	"github.com/embeddedgo/imxrt/hal/lpuart"
	"github.com/embeddedgo/imxrt/hal/lpuart/lpuart2"

	"github.com/embeddedgo/imxrt/devboard/teensy4/board/pins"
)

func fatalErr(err error) {
	for err != nil {
		fmt.Println("error:", err.Error())
		time.Sleep(time.Second)
	}
}

func main() {
	u := lpuart2.Driver()
	u.Setup(lpuart.Word8b, 115200)
	u.UsePin(pins.P14, lpuart.TXD)
	u.UsePin(pins.P15, lpuart.RXD)
	u.EnableRx(512)
	u.EnableTx()

	time.Sleep(5 * time.Second)

	fmt.Print("Initializing ESP-AT module... ")
	dev := espat.NewDevice("esp0", u, u)
	fatalErr(dev.Init(true))
	fmt.Println("OK")

	var ssid, passwd string

	fmt.Print("SSID: ")
	fmt.Scanln(&ssid)
	fmt.Print("Password: ")
	fmt.Scanln(&passwd)

	_, err := dev.Cmd("+CWMODE=1") // Wi-Fi station
	fatalErr(err)
	_, err = dev.Cmd("+CWJAP=", ssid, passwd)
	fatalErr(err)

	// Priodically print the connection state.
	for {
		s, err := dev.CmdStr("+CWSTATE?")
		fatalErr(err)
		fmt.Print(s)
		time.Sleep(5 * time.Second)
	}
}
By default, if the connection is successfully established, the SSID and password will be permanently saved by our Wi-Fi module. It’ll try to connect to the network after reboot or reconnect in case of the connection loss.
Interaction with this program may look like this:
Initializing ESP-AT module... OK
SSID: Home
Password: abc123xyz
+CWSTATE:2,"Home"
+CWSTATE:2,"Home"
+CWSTATE:2,"Home"
As the Wi-Fi credentials were saved by the ESP-AT firmware, we won’t set them in the following examples.
TCP client
It took a while, but we finally got there. Let’s write a simple TCP client program.
package main

import (
	"fmt"
	"io"
	"net"
	"os"
	"time"

	"github.com/embeddedgo/espat"
	"github.com/embeddedgo/espat/espnet"
	"github.com/embeddedgo/imxrt/hal/lpuart"
	"github.com/embeddedgo/imxrt/hal/lpuart/lpuart2"

	"github.com/embeddedgo/imxrt/devboard/teensy4/board/pins"
)

func logErr(err error) bool {
	for err == nil {
		return false
	}
	fmt.Println("error:", err.Error())
	return true
}

func fatalErr(err error) {
	for logErr(err) {
		time.Sleep(time.Second)
	}
}

func main() {
	u := lpuart2.Driver()
	u.Setup(lpuart.Word8b, 115200)
	u.UsePin(pins.P14, lpuart.TXD)
	u.UsePin(pins.P15, lpuart.RXD)
	u.EnableRx(512)
	u.EnableTx()

	time.Sleep(5 * time.Second)

	fmt.Print("Initializing Wi-Fi module... ")
	dev := espat.NewDevice("esp0", u, u)
	fatalErr(dev.Init(true))
	fmt.Println("OK")

	fmt.Println("Waiting for an IP address...")
	for msg := range dev.Async() {
		fatalErr(msg.Err)
		fmt.Println(msg.Str)
		if msg.Str == "WIFI GOT IP" {
			break
		}
	}

	var conn net.Conn
	for {
		if conn != nil {
			conn.Close()
		}
		time.Sleep(2 * time.Second) // one request every two seconds
		var err error
		conn, err = espnet.DialDev(dev, "tcp", "httpbin.org:80")
		if logErr(err) {
			continue
		}
		fmt.Print("\nSending HTTP request... ")
		_, err = io.WriteString(
			conn,
			"GET /ip HTTP/1.0\r\nHost: httpbin.org\r\n\r\n",
		)
		if logErr(err) {
			continue
		}
		fmt.Print("OK\nReceiving response:\n\n")
		_, err = io.Copy(os.Stdout, conn)
		logErr(err)
	}
}
If we ignore the Wi-Fi initialization and the waiting for an IP address, the only difference from a typical code of TCP client is the use of the espnet.DialDev function instead of net.Dial.
The output may look like this:
Initializing ESP-AT module... OK
Waiting for an IP address...
WIFI CONNECTED
WIFI GOT IP

Sending HTTP request... OK
Receiving response:

HTTP/1.1 200 OK
Date: Sun, 31 Dec 2023 21:58:14 GMT
Content-Type: application/json
Content-Length: 33
Connection: close
Server: gunicorn/19.9.0
Access-Control-Allow-Origin: *
Access-Control-Allow-Credentials: true

{
  "origin": "37.109.142.142"
}
HTTP server
Logically, the next example should be a simple TCP server. However, this article is getting too long, so we will go straight to the titular HTTP server. You can find the code of simple TCP echo server on Github.
package main

import (
	"fmt"
	"net/http"
	"strings"
	"time"

	"github.com/embeddedgo/espat"
	"github.com/embeddedgo/espat/espnet"
	"github.com/embeddedgo/imxrt/hal/lpuart"
	"github.com/embeddedgo/imxrt/hal/lpuart/lpuart2"

	"github.com/embeddedgo/imxrt/devboard/teensy4/board/pins"
)

func fatalErr(err error) {
	for err != nil {
		fmt.Println("error:", err.Error())
		time.Sleep(time.Second)
	}
}

func main() {
	u := lpuart2.Driver()
	u.Setup(lpuart.Word8b, 115200)
	u.UsePin(pins.P14, lpuart.TXD)
	u.UsePin(pins.P15, lpuart.RXD)
	u.EnableRx(512)
	u.EnableTx()

	time.Sleep(5 * time.Second)

	fmt.Print("Initializing Wi-Fi module... ")
	dev := espat.NewDevice("esp0", u, u)
	fatalErr(dev.Init(true))
	fmt.Println("OK")

	fmt.Println("Waiting for an IP address...")
	for msg := range dev.Async() {
		fatalErr(msg.Err)
		fmt.Println(msg.Str)
		if msg.Str == "WIFI GOT IP" {
			break
		}
	}

	// Print IP address.
	txt, err := dev.CmdStr("+CIPSTA?")
	fatalErr(err)
	fmt.Println(strings.ReplaceAll(txt, "+CIPSTA:", ""))

	ls, err := espnet.ListenDev(dev, "tcp", ":80")
	fatalErr(err)
	fmt.Println("Listen on:", ls.Addr())
	fatalErr(http.Serve(ls, http.HandlerFunc(handler)))
}

func handler(w http.ResponseWriter, r *http.Request) {
	fmt.Println(r.RemoteAddr, r.RequestURI)
	fmt.Fprintln(w, "Go HTTP server")
	fmt.Fprintln(w)
	fmt.Fprintln(w, "Method:    ", r.Method)
	fmt.Fprintln(w, "URL:       ", r.URL)
	fmt.Fprintln(w, "Proto:     ", r.Proto)
	fmt.Fprintln(w, "Host:      ", r.Host)
	fmt.Fprintln(w, "RemoteAddr:", r.RemoteAddr)
	fmt.Fprintln(w, "RequestURI:", r.RequestURI)
}
Similarly to the TCP client, the only difference from the typical Go program is the use of the espnet.ListenDev function instead of net.Listen.
If we run this program on Teensy it should print its IP address so we’ll know where to direct our web browser.
Initializing Wi-Fi module... OK
Waiting for an IP address...
WIFI CONNECTED
WIFI GOT IP
ip:"192.168.1.11"
gateway:"192.168.1.1"
netmask:"255.255.255.0"

Listen on: :80
If we enter the appropriate URL into our web browser (e.g. http://192.168.1.11/abc) then we should receive the response as below:
Go HTTP server

Method:     GET
URL:        /abc
Proto:      HTTP/1.1
Host:       192.168.1.11
RemoteAddr: 192.168.1.5:46674
RequestURI: /abc
and something like this on the USB console:
192.168.1.5:46674 /abc
192.168.1.5:46674 /favicon.ico
That’s all folks.
Happy New Year!
Michał Derkacz